-
Friends, our 2nd Amendment rights are always under attack and the NRA has been a constant for decades in helping fight that fight.
We have partnered with the NRA to offer you a discount on membership and Muzzleloading Forum gets a small percentage too of each membership, so you are supporting both the NRA and us.
Use this link to sign up please; https://membership.nra.org/recruiters/join/XR045103
You are using an out of date browser. It may not display this or other websites correctly.
You should upgrade or use an alternative browser.
You should upgrade or use an alternative browser.
#3 Hawken Full Stock
- Thread starter sean30ber
- Start date

Help Support Muzzleloading Forum:
This site may earn a commission from merchant affiliate
links, including eBay, Amazon, and others.
sean30ber said:30coupe. I'm probably going to keep it if he doesn't want it back. If not you'll be the first to know.
:thumbsup:
galamb
58 Cal.
Yes, would be correct to thread it and screw it into the the trigger plate. The rear of the guard is fastened to the plate with a screw coming down through the plate and into the guard in the rear curl.
Sorry, the pic is a little fuzzy (shaky hands no matter how many snaps I took) but should illustrate what I'm trying to say (badly) above.

Sorry, the pic is a little fuzzy (shaky hands no matter how many snaps I took) but should illustrate what I'm trying to say (badly) above.

Excellent. Thanks all. My blue print doesn't have the exploded view its all put together with ghost lines. Ill have to hit the local ma and pa hardware's for the single Die.
galamb
58 Cal.
Hey Dave,
if you look at the top of the pic I posted you will see that there are TWO screws/bolts that go from the tang (very long tang extending well down the wrist) through to the "trigger plate".
The lower part of the pic shows how many Hawken rifles had the trigger guard fixed to the trigger plate - the front post threaded and then a little screw in the rear, down through the plate itself with the curl on the trigger guard "tapped" to take the screw.
So you screw the guard into the plate (front end), then line up the back with the hole in the plate and screw the guard to the plate, then fasten the entire trigger assembly, with the guard attached in place with the two screws coming down through the wrist from the tang.
It's quirks such as this that lead many of the suppliers to recommend NOT building a Hawken as your first build. There are aspects of the build that are not "easily forgiven" if you do them incorrectly or out of order.
Getting the geometry correct on a percussion snail breech is another test of patience.
Unlike a flint or drum style percussion where you inlet the barrel, then the lock and then drill your hole (to install the drum/liner) - all one at a time with each being lined up according to the previous operation, the barrel, breech and lock all have to come together at the same time and must be lined up with each other without gaps and at the correct angle so that the hammer will strike the nipple square.
sean30ber said:Now there is an idea. Thanks for the company name. Just looked them up. Nice work. I was thinking Lock plate, Butt plate and trigger guard.
Regarding the trigger guard and color case hardening...I've had a professional antique firearm restorer/gunsmith and two builders of Hawken rifles that do their own color case hardening tell me that trigger guards are too susceptible to warping in the process and highly recommended not doing that part.
I'm doing a fullstock flint Hawken build and plan to have the lock plate, cock, tang, hooked breech plug, and buttplate color case hardened.
Well, While im waiting on the new stock to arrive I picked up a new tap and die set and went to work. Im still waiting on the un-plated screw for the rear of the guard but hear is the front. When the rear trigger is set, it is in perfect alignment with the rear of the bow. Aligning with the stock I have there is plenty of room for the front tang screw. Plenty of room up front for gloved shooting. I like Don's larger Trigger bow.
This thing is rock solid like this.
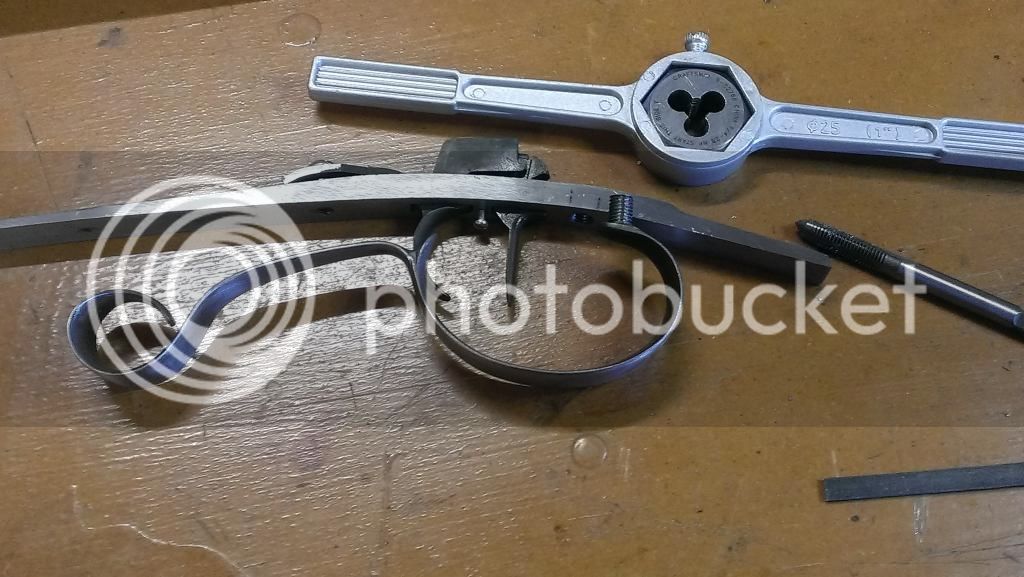
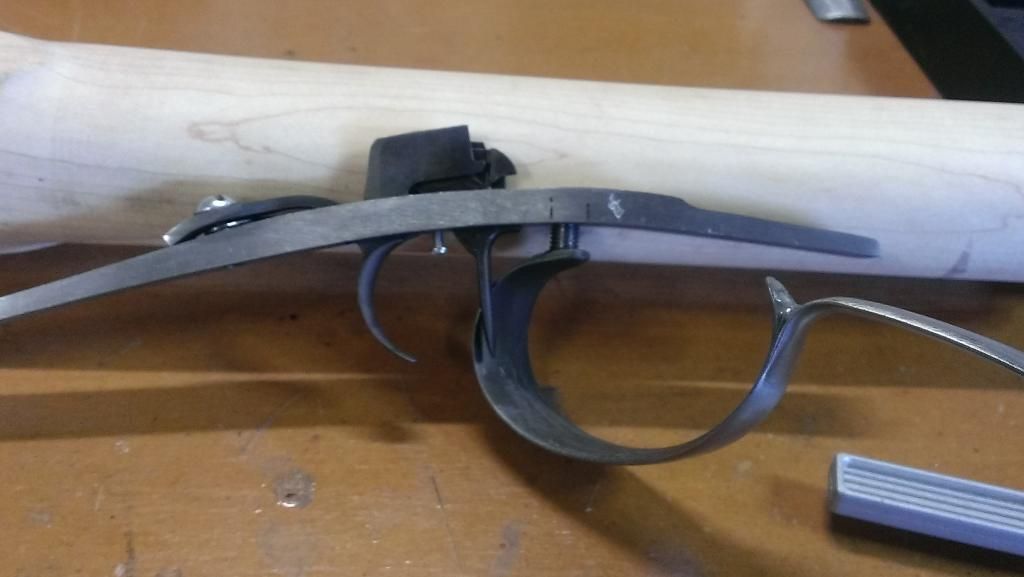
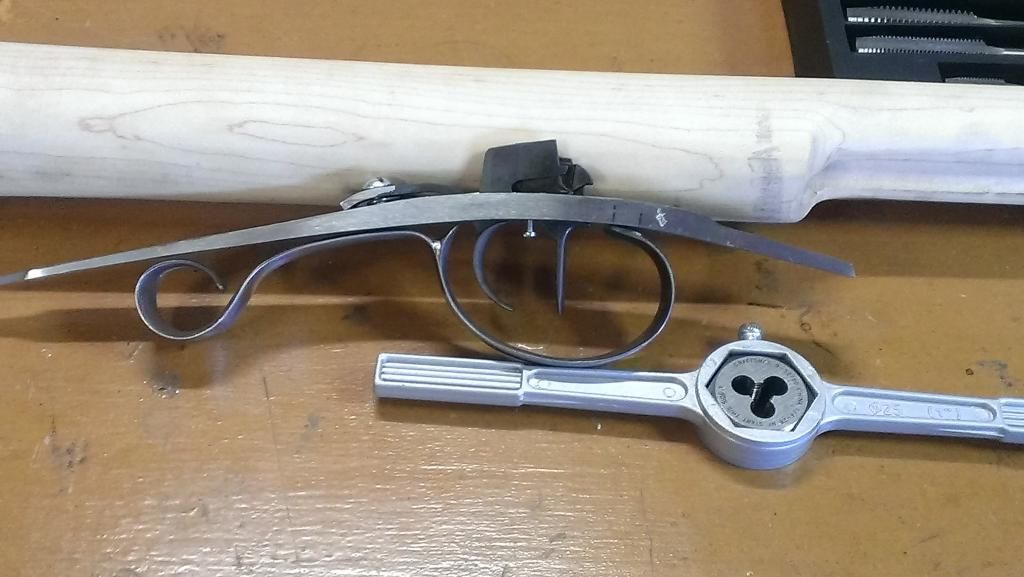
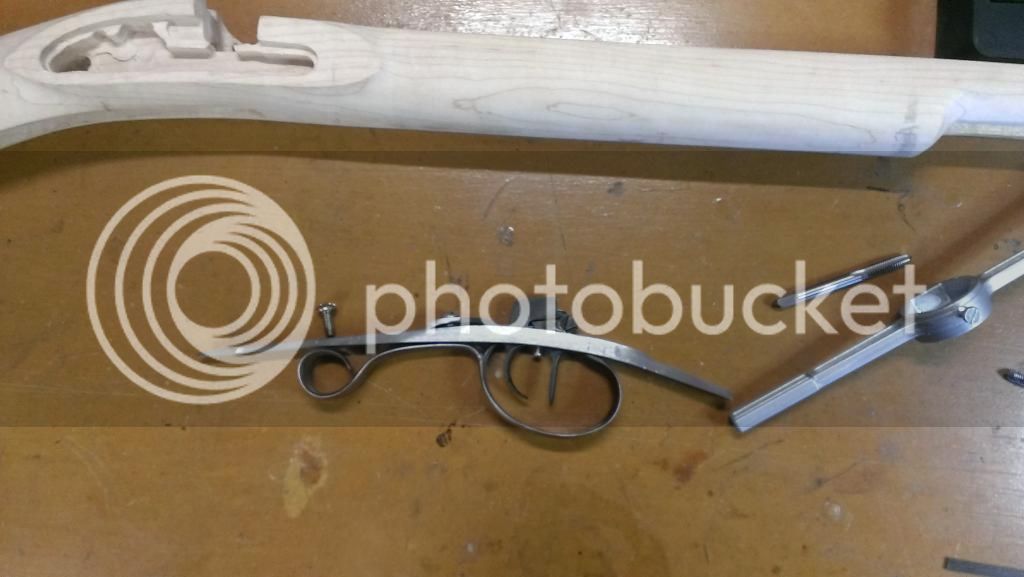
This thing is rock solid like this.


galamb said:Getting the geometry correct on a percussion snail breech is another test of patience.
Unlike a flint or drum style percussion where you inlet the barrel, then the lock and then drill your hole (to install the drum/liner) - all one at a time with each being lined up according to the previous operation, the barrel, breech and lock all have to come together at the same time and must be lined up with each other without gaps and at the correct angle so that the hammer will strike the nipple square.
I am in the process of talking myself into building one of Stith's Hawken Squirrel rifles. Does the pre-inlet stock (90%) make this match up on the snail any less difficult?
Sean, I am going to be watching your build and maybe following in your footsteps.
Galamb will have to answer your questions on the snail breech as Ive never done one. I talked with Don and ordered the straight flint breech and ill use a standard drum and nipple. Those I've done and are easy. Ive got Turpin's Building Muzzleloaders #2 Percussion, and follow that. I also have several of the gun building books. I like the spiral ones as they lay flat on the bench and I can follow along. Im just a rookie. Don said I should get my new stock soon, so I should be rocking on it before long.
galamb
58 Cal.
dmills said:I am in the process of talking myself into building one of Stith's Hawken Squirrel rifles. Does the pre-inlet stock (90%) make this match up on the snail any less difficult?
I actually prefer the lock not being pre-inlet, it just leaves you extra room to get things right.
With a pre-inlet lock you are now working with a couple more variables that all have to come together at the exact same time.
I will try and explain, but it's convoluted.
(if you have the lock pre-inlet 90-95%)
As you are inletting the tang/plug/barrel, roughly try the lock in it's inlet "often".
Yes it's sitting on top quite a bit, but you will see if the notch is lined up close enough to where your breech is that the lock won't have gaps around the inlet.
Even though the lock is "mostly inlet" you still have a little wiggle room to get things lined up properly.
That might sound confusing but that is part of why they say not to try this as a first project.
IF you inlet the barrel/plug/tang too far back OR forward(and I mean 1/32" is too far) you will have gaps somewhere because you only have so much wiggle room on a pre-inlet lock - the cutout in the lock must "hug" that snail.
Once the barrel has reached it's final position, you can go at the lock.
The barrel/tang was tricky because of the beavertail tang - if you start inletting it and realize you are too far forward or too far back and try and move it, you will have gaps around the tang.
(what this boils down to, you are trying to figure where the tang needs to be with it sitting not inletted yet, and have the breech snail, which is not bottomed out in the barrel channel, lined up with the cut in the bolster, which is sitting proud of the inlet, BEFORE you start inletting the tang. And if you get any of that wrong, you have "gaps"- and then you just pray that there is enough wiggle room in your lock inlet incase you were out a couple mils and the snail is now binding or not precisely lined up with the cutout)
So now with the barrel in ”“ good or bad, it’s time to fit the lock.
The best way that I have found to do it is - strip most of the guts out of the lock (mainspring, sear spring and sear etc) just leave the tumbler in place and the hammer fastened - that way you can see "where the hammer will fall" operating it by hand.
So now that you have the lock with the floppy hammer you (finish the)inlet in the bolster area (the part that snugs up against the barrel) until the lock plate bottoms out (sitting proud) in the unfinished inlet - so the bolster won't quite be touching the barrel but will be close, but the bolster will totally be in the inlet ”“ just the lock plate will be “hung up”.
Then snug the snail notch cut in the lock (if you have a pre-cut) as tight to the snail breech as you can.
If you haven't already installed a nipple in the breech do it now - you need to rotate the entire lock at this point to get the hammer to hit the nipple "flat" - while you can modify/bend the hammer a bit, as a first step you want to get it as close as possible without rotating the lock into a position that is noticeably cock-eyed.
Since the lock is not all the way inlet, the hammer will likely not (cover) the nipple, it will be out too far, but you will see the "geometry".
Once you have it where you want it, and the notch in the bolster is still tight to the snail (in fact it is acceptable to be kinda lifting the barrel up a hair - the cut out can be "touched up" with a file for a final perfect fit - most are just a touch "too small" on purpose to allow final fitting - in a pinch you can also file the snail itself as long as you don't go nuts - I'm talking like 1/64th-1/128th of an inch), I trace around the outside of the lock (while holding it firmly in place) with a pencil.
That tracing is now the "outside" of your final lock inlet.
Then just finish inletting slowing, keep retrying the fit.
It helps if you file a draft around the lockplate -just taper it a hair so that it kinda wedges into your inlet (standard practice with any lock, inlay, sideplate etc).
(the above is probably confusing - I have re-read/re-worded it a couple times and I'm confused myself :rotf: - which is probably where the second part of the recommendation for Hawken builders is the suggestion of a mentor - somethings are just super difficult to try and explain)

And so it begins. Got the new stock, NO CRACKS.
sorry bad pics. Not 100% curl but very nice. The pre-inletting leaves no room for error on this one. The way the lock is pre-inlet there is no choice in its location so im going to have to fit the barrel to the lock instead of the lock to the barrel. Thats going to take some slow going.
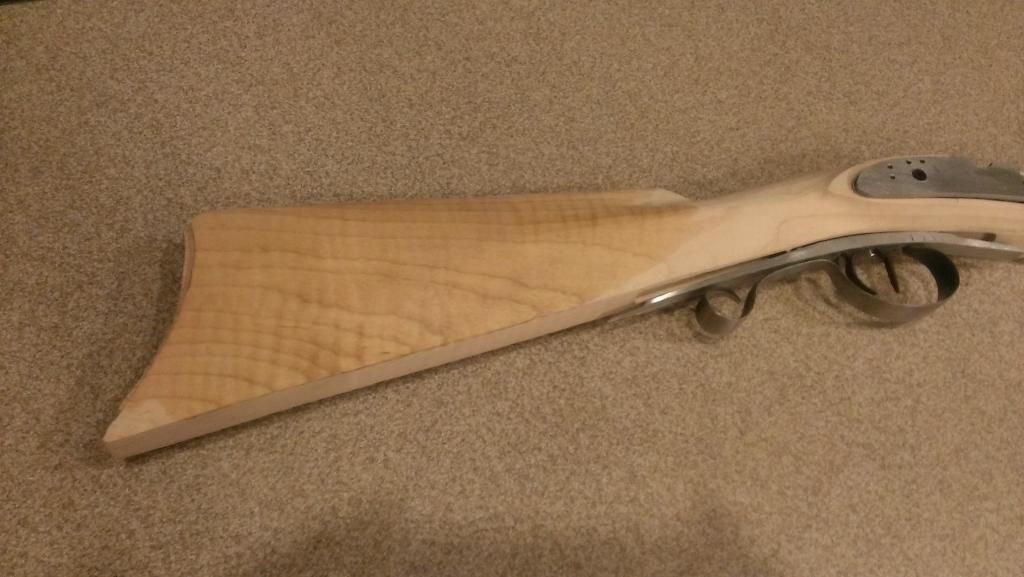
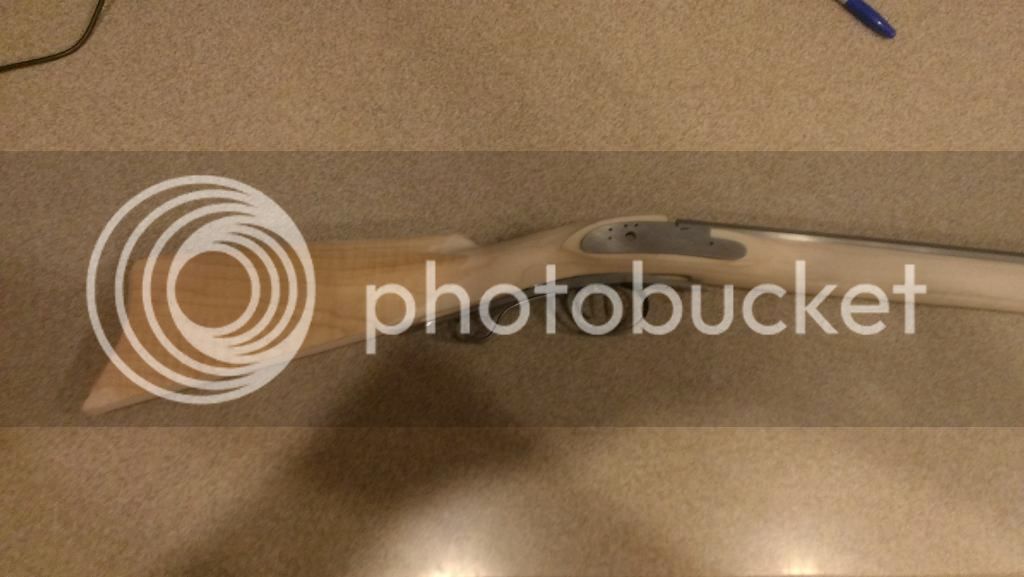
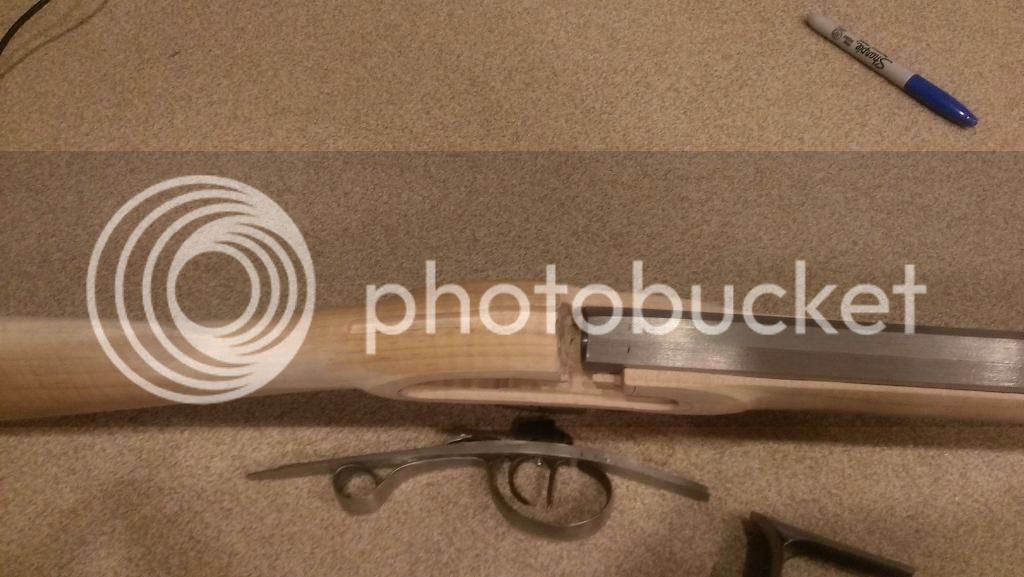
sorry bad pics. Not 100% curl but very nice. The pre-inletting leaves no room for error on this one. The way the lock is pre-inlet there is no choice in its location so im going to have to fit the barrel to the lock instead of the lock to the barrel. Thats going to take some slow going.


galamb
58 Cal.
That is a fine looking piece of wood - can see the curls well in the butt.
Are you putting a patch/cap box on this or leaving it plain?
And yes, from what I can see the lock panel and the inlet itself is pretty well set, so as you note - make the barrel fit the lock.
Maybe not the preferred way to do it and perhaps a bit more tedious so definitely take your time and at the first sign of weariness or impatience set it aside and walk away.
However, since the tang is also inlet I suspect Don was careful about making sure that the whole shebang would have a "glove like" fit.
Which lock did you end up going with???
L&R 300 trade lock as it interchanges with the 900 flint if I ever want to revert in the future. I'm still figuring out how to tackle the lock barrel fit. I've got the barrel breeched, and the drum position on the barrel. The barrel has to come back so I figure its like you explained even with a drum instead of the snail breech.
Does this sound about right. Inlet the barrel back and down (without the tang on) but with the drum installed so it lines up with the lock placement and its in its final rearward position, then inlet the lock, then re-install the tang and inlet it down. Maybe Im out of order. Just wonder if there is a certain 1,2,3 procedure for this.
The tang really isn't inlet. Just the center wood for a few inches. Don evidently has a shaper he uses as he told me the gentlemen shipped it direct to me and if there was a problem with the shipping let him know. The barrel inlet is just a tad loose at the front but I can make it work. I like em tight so I have to scrape fit them.
I was thinking about a patch box but I think ill wait and see how it finishes. I can always do it later.
sean30ber said:This thing is rock solid like this.

Sean..... :hmm: I kept looking at this picture (as I have to do the same assembly and drill 'n tap to my trigger guard) and kept wondering..."How did he get the trigger guard to screw in without constantly pulling the trigger? Or...did he constantly keep shooting himself in the foot every time he made a turn? :idunno: Or was this where the phrase "A turn for the worse" actually came from? :shocked2:

Ok. Ok. Enough foolishness.....Nice picture post. I'm a "vision" learner and photos help me a bunch. I do appreciate the post....and no...I'm not trying out for Jay Leno's job. (Even tho I believe I could take in in a heartbeat!! :grin: )
Dave
PS....Since mine will be a flinter, I don't have all of the alignment foolishness you have with a cap lock. Just the trigger alignment...for the most part. The pan alignment isn't really all that difficult...well, as long as the barrel is properly fitted first...or is that second?....or is that last????.....I gotta go clean a shotgun.
Ive never done a pre-inlet lock and never had an issue. I got to tell you Im not liking the pre inlet locks. There would be no issues at all if lock panal were left uncut for our own aligning. Oh well.
galamb
58 Cal.
Dave, "normally" you inlet the barrel/plug/tang all as one unit (the tang gets glued or soldered to the plug to keep it from moving until you are done and then separated again.
(as you are now realizing an "non-inlet" lock panel would make the process infinitely easier)
What I think I would do in this case is finish inletting the barrel with the plug "only". That should allow you to get the snail where it needs to be in relation to the lock which you can maybe move a hair.
(**if you end up with a gap between the lock cut out and the snail where they meet it will probably bug you forever - at least it does me - have an Ohio that I thought I had nailed and then something moved on me and the lock is about 1/64" lower than where it should have been - that gap around the whole lower crescent of the snail is just irritating - messed with it trying to lower the barrel a bit only led to more problems so ended up with the GAP and of course it's the first thing you notice - so patience/check/fit/check again)
At worst you can always fill/patch or bed behind the breech if you go a touch too far back with the barrel/plug - it won't be seen there so easier to hide compared to trying to fill gaps around the tang if it has to move.
This will make fitting the tang just a touch trickier, but think it's your best option unless you get part way through the operation and you can see that things will line up nicely and go for the whole thing at that point.
This particular (kit) might be one of those where a lock without the cut-out for the snail would have been a superior choice. While you still need to get the geometry very close, you do file out yourself for the snail and can bend/tweak the hammer to line up (which you may end up doing anyhow - I have never had one line up, so the hammer always has to be tweaked a bit)
Similar threads
- Replies
- 1
- Views
- 493
SOLD - Pending funds
Custom Full Stock Hawken Rifle In .50
- Replies
- 4
- Views
- 761
- Replies
- 6
- Views
- 1K
- Replies
- 5
- Views
- 1K
Latest posts
-
-
-
-
-
FOR SALE very nice Veteran Arms 1st Land Pattern Brown Bess for sale!
- Latest: FlintlockMilitaryRifle
-
-
-


