Great ‘little’ details of ‘large’ importance there Dave! Thank you!
You are using an out of date browser. It may not display this or other websites correctly.
You should upgrade or use an alternative browser.
You should upgrade or use an alternative browser.
Building a Ferguson Rifle from Rifle Shoppe Part Set
- Thread starter dave_person
- Start date

Help Support Muzzleloading Forum:
This site may earn a commission from merchant affiliate
links, including eBay, Amazon, and others.
- Joined
- Nov 26, 2005
- Messages
- 5,283
- Reaction score
- 11,263
Hi,
Thank you all for looking and your comments. If you search for images of Ferguson rifles online, you will see a few original guns and a lot of reproductions and even You Tube videos. Almost all of those reproductions are wrong despite some that are very well made by skilled gun makers. Regardless, it is clear they never handled the original military rifles or even any of the civilian ones. Every one I have seen is too bulky. If you work from the TRS plans you will also tend to make a fat Ferguson. I've never handled the Milwaukee Museum original Ferguson, which the TRS parts set is based on. However, I am sure it does not vary greatly from the Morristown gun. When looking at photos of both rifles in Bailey's "British Flintlock Military Rifles" you can plainly see how slim the stock actually is through the lock area. Here lies a problem. The bolster on the TRS reproduction lock plate is significantly wider than the original locks. They may have done that to produce stronger reproduction stocks (more width). For us it means we have to carefully shape the stock to mitigate that difference and get something looking close to the originals. It is not as simple as filing the bolster thinner. The entire inner workings of the lock have to be modified and in particular, you have to install a completely different mainspring that can fit in a smaller space against the breech. That thinner profile is why the sear bar barely reaches the trigger bar on the reproductions. The sear is copied from the original but the original was thinner. So what to do? Well, I just work hard to mitigate the differences. I am not going to thin the lock bolster but will trim down as much wood as I can from the lock area. I will also test the trigger when pinned to make sure it is crisp and light. If it is mushy because it hits the sear at the far end, I will fabricate a new longer and more robust sear as I did on my first Ferguson.
So today I did a lot of final shaping of the stock. I painted the stock with orange water based aniline dye to show up rough spots in the walnut and begin the whiskering process. I thinned the lock panels almost to final shape.
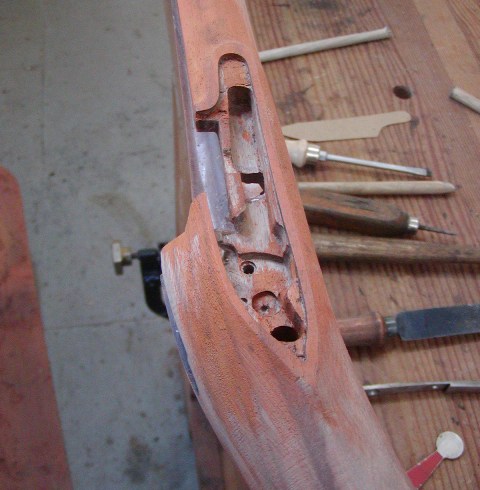
They will be narrower still. I did the same on the opposite side.
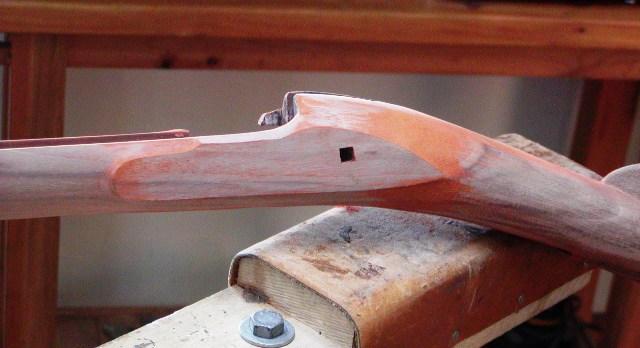
The top of the breech area is shaped to merge with the barrel and look like the barrel tang sits up on top of a pedestal.
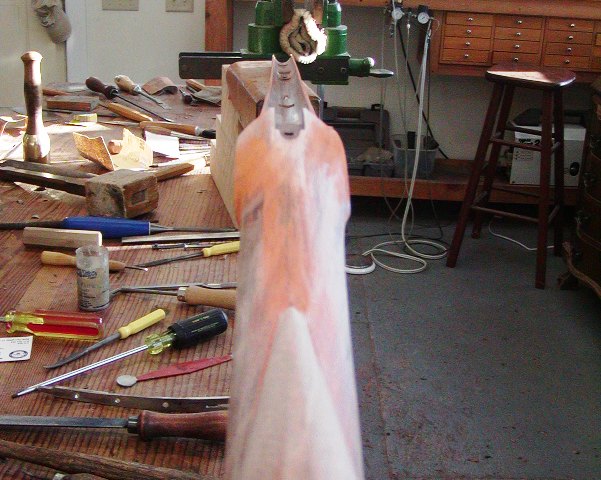
The bottom of the lock area is well rounded, not flattened.
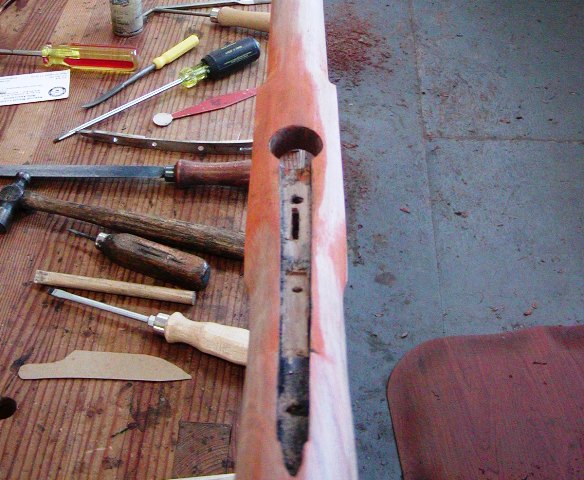
The stock is thinned with very little wood left along the barrel channel.
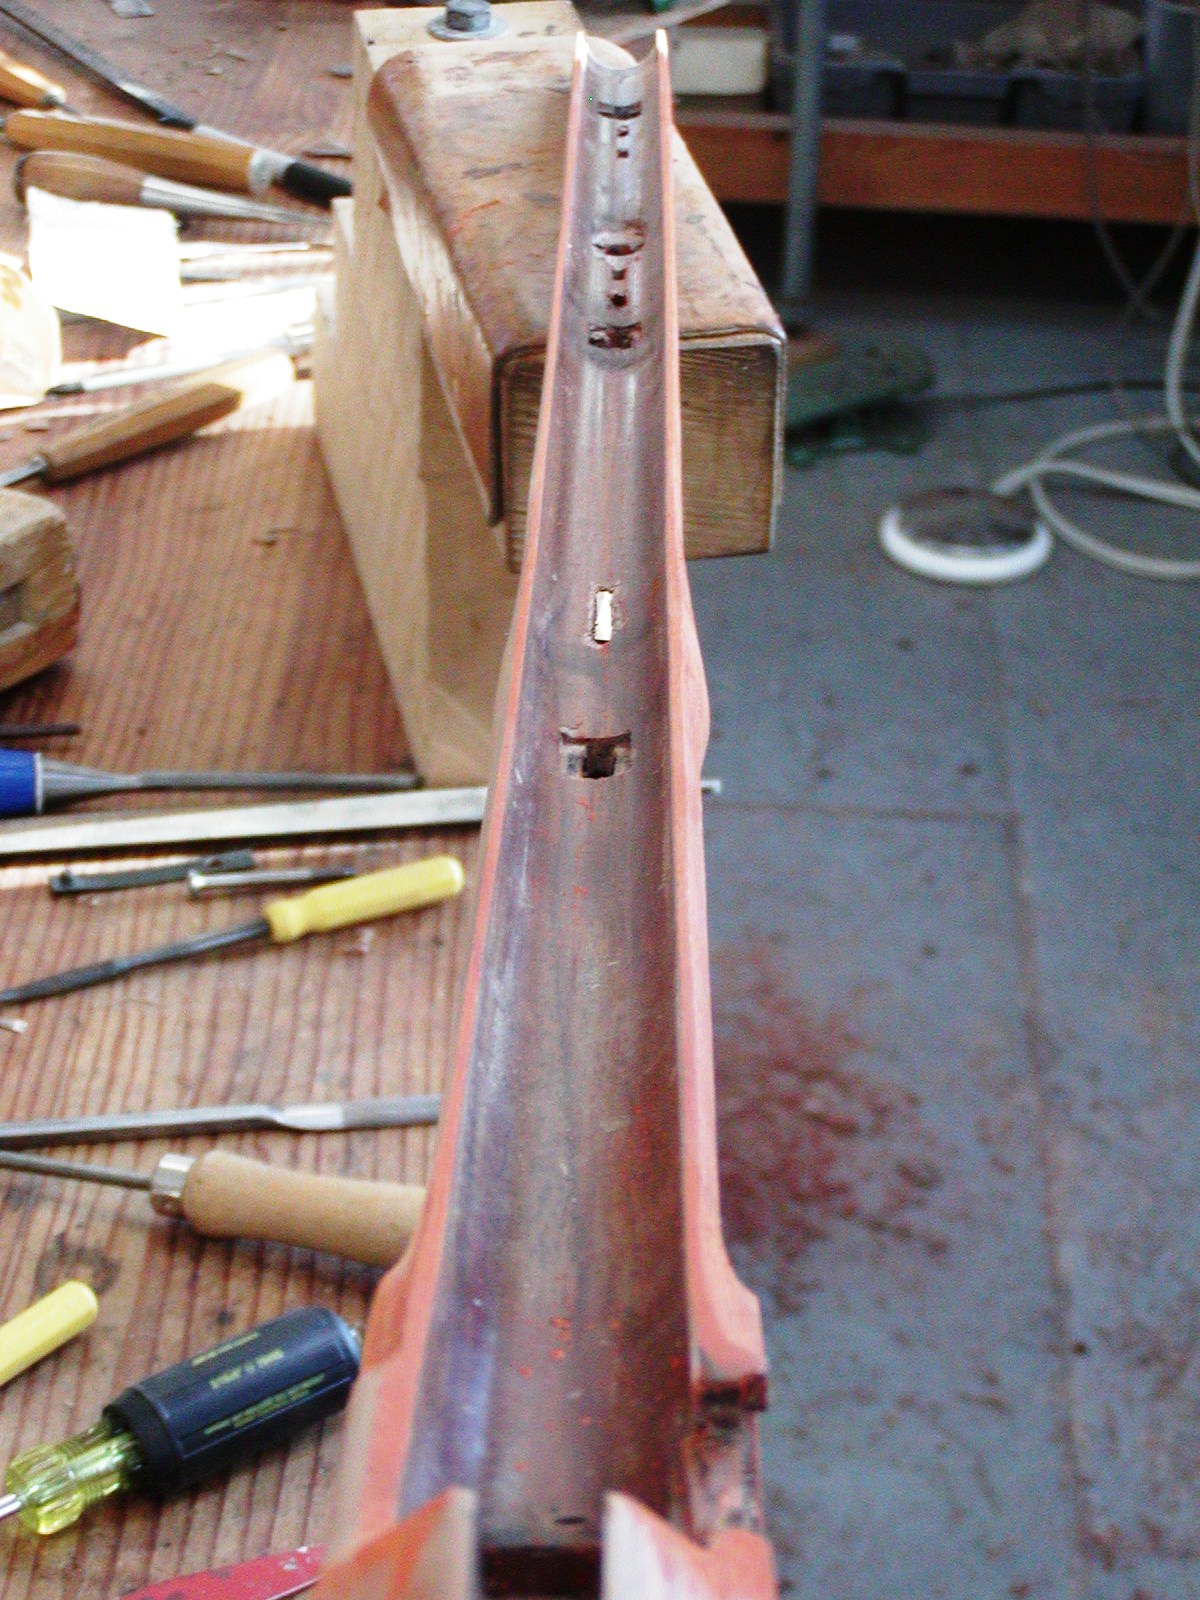
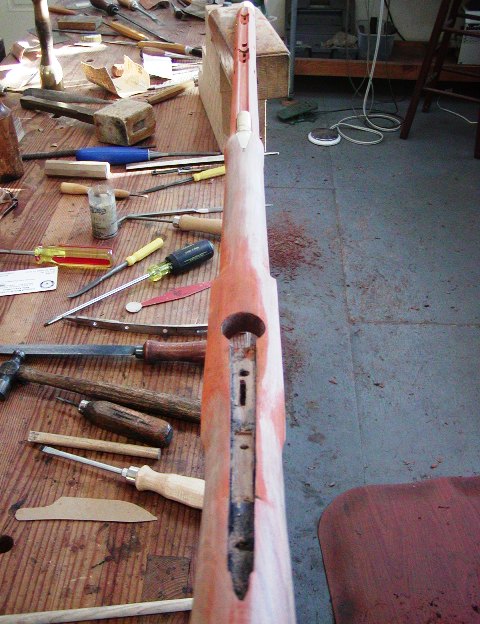
There is no big step in the stock at the nose cap.
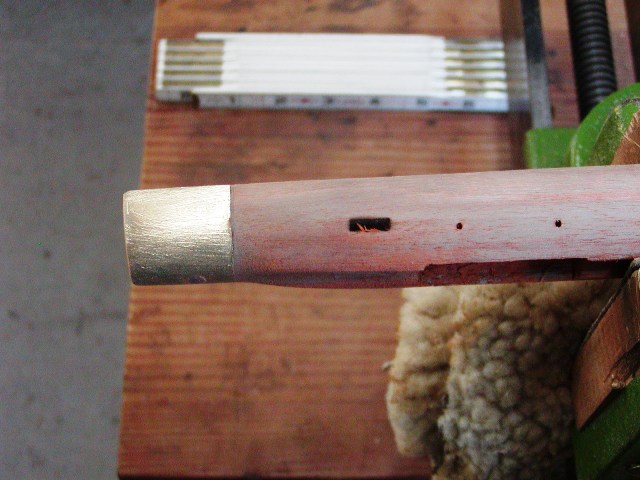
The comb of the buttstock should be 9" long from the forward edge of the screw in the heel of the buttplate to the end of the top of the comb. The nose of the comb is convex, not concave in shape like the TRS plans.
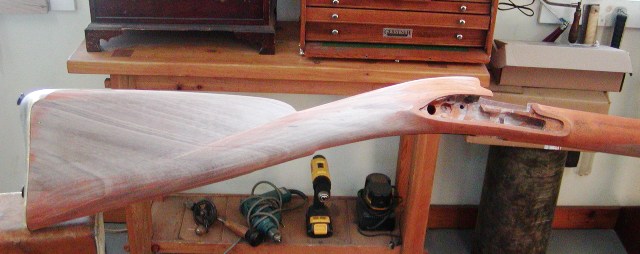
The stock for the rifle is more like the pattern 1776 Royal Forester's dragoon carbine than like a Brown Bess musket.
More to come.
dave
Thank you all for looking and your comments. If you search for images of Ferguson rifles online, you will see a few original guns and a lot of reproductions and even You Tube videos. Almost all of those reproductions are wrong despite some that are very well made by skilled gun makers. Regardless, it is clear they never handled the original military rifles or even any of the civilian ones. Every one I have seen is too bulky. If you work from the TRS plans you will also tend to make a fat Ferguson. I've never handled the Milwaukee Museum original Ferguson, which the TRS parts set is based on. However, I am sure it does not vary greatly from the Morristown gun. When looking at photos of both rifles in Bailey's "British Flintlock Military Rifles" you can plainly see how slim the stock actually is through the lock area. Here lies a problem. The bolster on the TRS reproduction lock plate is significantly wider than the original locks. They may have done that to produce stronger reproduction stocks (more width). For us it means we have to carefully shape the stock to mitigate that difference and get something looking close to the originals. It is not as simple as filing the bolster thinner. The entire inner workings of the lock have to be modified and in particular, you have to install a completely different mainspring that can fit in a smaller space against the breech. That thinner profile is why the sear bar barely reaches the trigger bar on the reproductions. The sear is copied from the original but the original was thinner. So what to do? Well, I just work hard to mitigate the differences. I am not going to thin the lock bolster but will trim down as much wood as I can from the lock area. I will also test the trigger when pinned to make sure it is crisp and light. If it is mushy because it hits the sear at the far end, I will fabricate a new longer and more robust sear as I did on my first Ferguson.
So today I did a lot of final shaping of the stock. I painted the stock with orange water based aniline dye to show up rough spots in the walnut and begin the whiskering process. I thinned the lock panels almost to final shape.

They will be narrower still. I did the same on the opposite side.

The top of the breech area is shaped to merge with the barrel and look like the barrel tang sits up on top of a pedestal.

The bottom of the lock area is well rounded, not flattened.

The stock is thinned with very little wood left along the barrel channel.


There is no big step in the stock at the nose cap.

The comb of the buttstock should be 9" long from the forward edge of the screw in the heel of the buttplate to the end of the top of the comb. The nose of the comb is convex, not concave in shape like the TRS plans.

The stock for the rifle is more like the pattern 1776 Royal Forester's dragoon carbine than like a Brown Bess musket.
More to come.
dave
Very interesting thread, a lot of work but great craftsmanship
- Joined
- Nov 26, 2005
- Messages
- 5,283
- Reaction score
- 11,263
Hi Folks,
Its PINK!
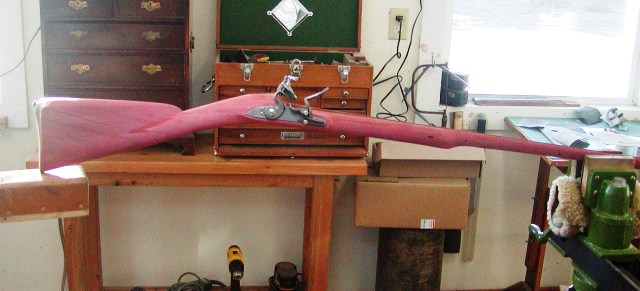
It's a pink Ferguson. A little known historical fact, Patrick's real nickname wasn't "Paddie", it was "Pinky" because of the light red shirt he used to wear into battle.
Got closer to the final shape and details today. Note the thin lock and side panels. It will get a little thinner yet. When the pink is all gone, I should be down to those final dimensions.
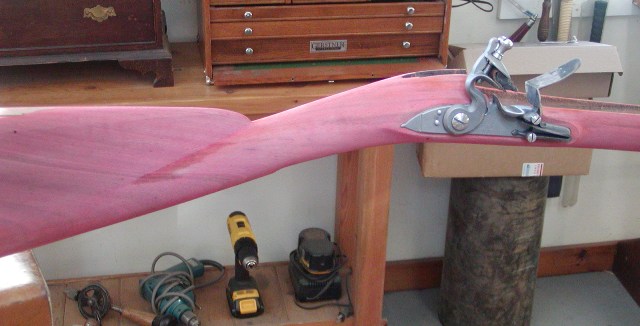
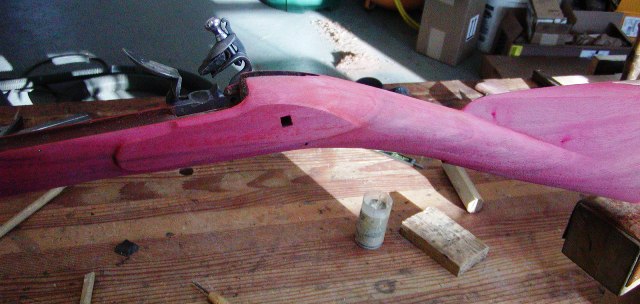
Everything buttons up nicely. I pinned the trigger and I think it will do fine. I have to lighten it a bit but it does not have a mushy, creepy feel. It is pretty crisp. One issue is the sear drops down lower on the lock plate when at half cock than when the lock is at full cock. That means the trigger bar snugs against the sear at half cock with no rattle but has rattle at full cock. That is the most difficult problem to cure and is the result from the half cock notch being too deep. I will figure it out. Also, the original Fergusons have the slots for the trigger in the trigger plate far to the right (close to the lock). That helps deal with trigger mush but the TRS plate has the slot almost centered. Why they did that, I have no idea. So I may weld the trigger slot shut and cut a new one further to the right. If I do that, I will also glue a shim of wood into the slot in the stock and then cut a new slot further to the right. I just have to see how things go as they are and if I need to make changes to meet my standards of performance.
Well, I will be finishing up the stock shaping. What color will it be? I can assure you not green or blue.................. black maybe.
dave
Its PINK!

It's a pink Ferguson. A little known historical fact, Patrick's real nickname wasn't "Paddie", it was "Pinky" because of the light red shirt he used to wear into battle.
Got closer to the final shape and details today. Note the thin lock and side panels. It will get a little thinner yet. When the pink is all gone, I should be down to those final dimensions.


Everything buttons up nicely. I pinned the trigger and I think it will do fine. I have to lighten it a bit but it does not have a mushy, creepy feel. It is pretty crisp. One issue is the sear drops down lower on the lock plate when at half cock than when the lock is at full cock. That means the trigger bar snugs against the sear at half cock with no rattle but has rattle at full cock. That is the most difficult problem to cure and is the result from the half cock notch being too deep. I will figure it out. Also, the original Fergusons have the slots for the trigger in the trigger plate far to the right (close to the lock). That helps deal with trigger mush but the TRS plate has the slot almost centered. Why they did that, I have no idea. So I may weld the trigger slot shut and cut a new one further to the right. If I do that, I will also glue a shim of wood into the slot in the stock and then cut a new slot further to the right. I just have to see how things go as they are and if I need to make changes to meet my standards of performance.
Well, I will be finishing up the stock shaping. What color will it be? I can assure you not green or blue.................. black maybe.
dave
Sam squanch
69 Cal.
- Joined
- Oct 9, 2019
- Messages
- 3,312
- Reaction score
- 4,740
That is a most shocking color….
No wonder why there aren’t many around anymore 


- Joined
- Nov 26, 2005
- Messages
- 5,283
- Reaction score
- 11,263
Hi Bob,
Yeah, they are decorating adolescent girls bedrooms along with pink unicorns. No collectors think to look for them there.
dave
Yeah, they are decorating adolescent girls bedrooms along with pink unicorns. No collectors think to look for them there.
dave
Sam squanch
69 Cal.
- Joined
- Oct 9, 2019
- Messages
- 3,312
- Reaction score
- 4,740
Well with that color, no one would steal it….
- Joined
- Nov 26, 2005
- Messages
- 5,283
- Reaction score
- 11,263
Hi LT Joe,
Great question. There is a screw that enters the lock plate near the top and in front of the flint cock. It threads into a blind hole drilled into the breech behind the screw plug. Here is a photo showing it.
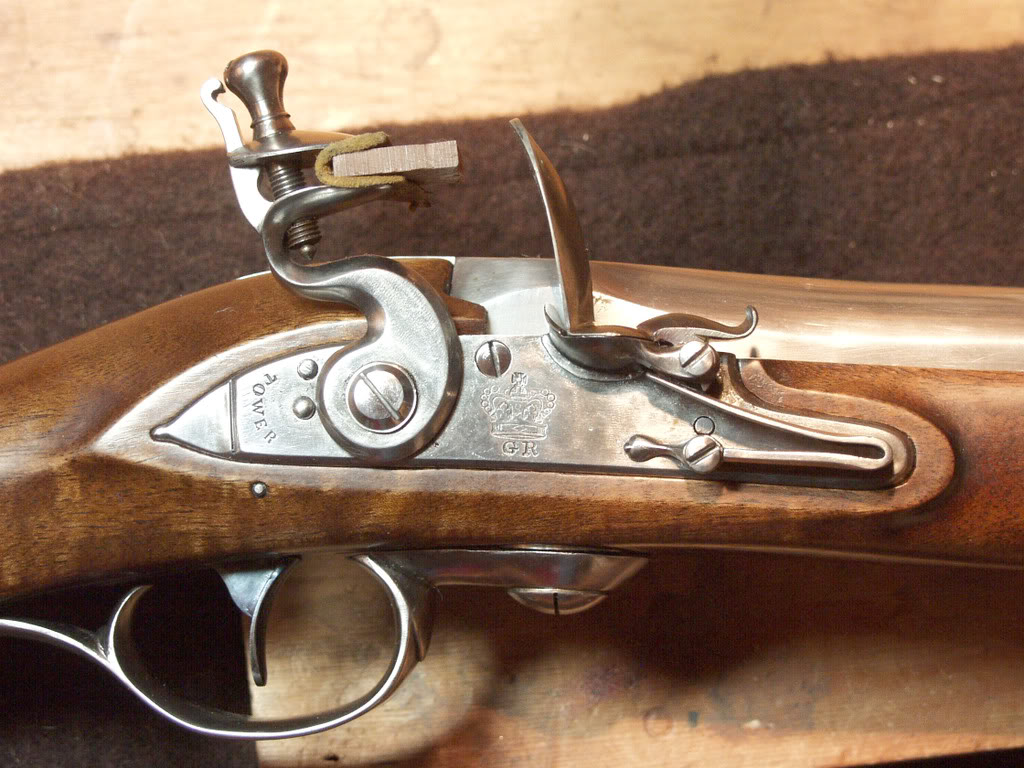
The original rifle in the Milwaukee Museum gun also has a hooked lug on the inside of the nose in front of the mainspring. That hooks into a screw head embedded in the front of the lock mortise. I do not know if the Morristown gun has the forward lug. The TRS lock does not have the lug and it is really not needed if you carefully intlet the lock so the rear screw is all that is needed to pull the lock tight against the breech.
dave
Great question. There is a screw that enters the lock plate near the top and in front of the flint cock. It threads into a blind hole drilled into the breech behind the screw plug. Here is a photo showing it.

The original rifle in the Milwaukee Museum gun also has a hooked lug on the inside of the nose in front of the mainspring. That hooks into a screw head embedded in the front of the lock mortise. I do not know if the Morristown gun has the forward lug. The TRS lock does not have the lug and it is really not needed if you carefully intlet the lock so the rear screw is all that is needed to pull the lock tight against the breech.
dave
Felix the Cat
40 Cal
Excellent build Dave!
My Ferguson did leak from the bottom of the plug and I had to spend some time filing and scraping the plug base so that the trigger guard closed tight on the bottom of the barrel extension. It still leaks a bit, but at least I don't get a black streak on my hand and sparks down my collar..
Just finished a TRS Baker.. I didn't braise in the loops this time, just dovetailed them.. I will see how it goes. They have banned cadmium in silver solder this side of the pond and the cadmium free stuff is horrible. I used the last of my stash of cadmium alloy to solder the bayonet bar and TIGed the sling swivel after the third braise fail... grrr.
I tried your tip for burning in keys, and it works a treat... thank you!
TDM
Cannon
- Joined
- May 28, 2022
- Messages
- 9,677
- Reaction score
- 24,302
- Location
- Louisiana & My camp in Mississippi
@dave_person, I had completely missed your build thread until today. Beautiful work indeed. Excellent job.
- Joined
- Nov 26, 2005
- Messages
- 5,283
- Reaction score
- 11,263
Hi Felix,
Nice to hear from a friend across the pond!! There is some speculation that a leather washer was installed on the screw plug below the trigger guard. But it never comes up in any of Ferguson's writings or notes. My Ferguson does not leak gas on the bottom but definitely from the top. I always wear a hat when shooting the rifle or I end up with a slight burn line across my forehead. Ernie Cowan and Robert Keller swear that the hand lapped bronze plug makes all the difference. But they great majority of surviving rifles do not have bronze plugs so I am skeptical of that claim. The hand lapped part may be true. If it is, it indicates another weakness of the gun as a large production military weapon for the British in the 18th century. The few Birmingham makers qualified to make the rifle could produce 100 of them in a year or a 1000 muzzleloading rifles. Which served the country better? Anyway, thanks for the note Felix and please don't hesitate to comment on this thread.
dave
- Joined
- Nov 26, 2005
- Messages
- 5,283
- Reaction score
- 11,263
Hi,
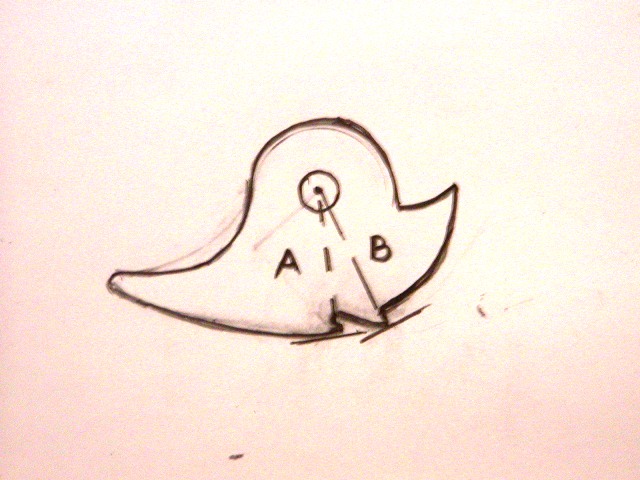
Got more done. First let me discuss the lock. This post will have a lot of technical details. It will require careful reading but if you do that, you will learn some things pretty fundamental to good muzzleloading gunsmithing that you probably will never read anywhere else. The Ferguson lock is a standard design used on modest quality sporting guns of the time (1770s) and produced to a more robust military standard. The TRS version has two features very different from the originals. The cast in engraving is of much higher quality than found on the originals. The manufacture of the original guns was hurried and the crown engraving on the locks was very crude. So crude that if I ever duplicated it for a client, they would accuse me of shoddy work. The other difference is the lock plate bolster is much thicker than the originals and the trigger slot in the trigger plate is too centered. On the originals, the bolster was much thinner and the trigger much more to the right (toward the lock) of the trigger plate. However, TRS did not mitigate those changes by lengthening the sear bar so it fully overlaps the trigger bar. As a result, the sear barely overlaps the trigger bar. It is so close that you could install the lock, tighten down the lock screw and still have it not slide over the trigger bar. So, despite the lock coming assembled and heat treated, I will weld steel on to the sear to give more clearance and strength and then I will case harden and temper all of the internal parts again. I don't want the fit of the sear over the trigger to be marginal in the slightest so the owner never has to worry how he installed the lock. Another issue. The sear moves up and down when the lock is pulled from rest to half cock and then full cock. The sear drops lowest on the lock plate at half cock so the problem is to make a trigger arrangement that allows a solid half cock engagement but also a full cock where the trigger doesn't rattle and there is a lot of trigger creep. The problem on this lock is that the half cock notch is too deep. However, I don't want to fool with that because the other tumbler geometry is good. This style lock does not have a fly detent. That means it is a challenge to adjust the trigger and lock to have a light, crisp pull. The critical feature here is the lock tumbler and the design of the half cock and full cock notches. Without a fly detent, the lip of the halfcock notch must be lower then the lip of the full cock notch. That way, when the sear is pushed up by the trigger bar and releases the tumbler, the sear is far enough away from the tumbler not to hit the lip of the half cock notch. The lighter the trigger pull, the more important that geometry is, which is why fly detents are essential for set triggers. Here is a diagram. Distance A must be less than distance B or the lock risks catching in half cock when fired.
The TRS assembled lock satisfies that geometry and I don't want to fool with it trying to adjust the depth of the half cock notch. So I devised another solution involving a light trigger spring that keeps the trigger bar against the sear of the lock despite its position.
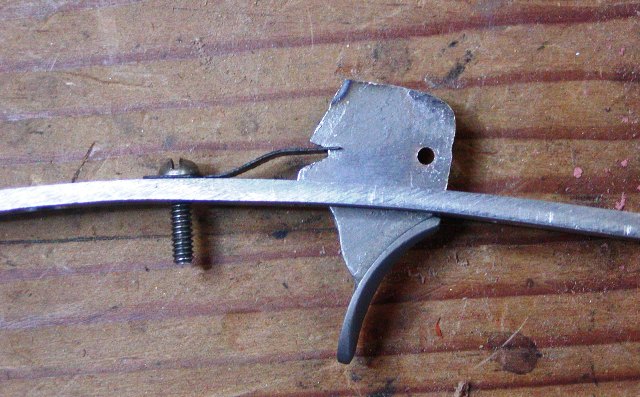
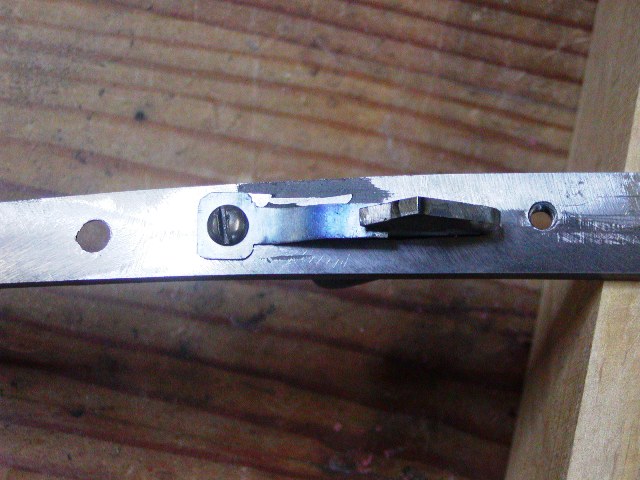
It does the trick perfectly but is by no means a feature on any of the original rifles. It is a means for me to give the owner a good, crisp, safe, and light trigger pull.
I painted the stock with yellow aniline dye that was not scraped off. That color eliminates the cold grey-purple-brown of much American black walnut and turns it into English walnut. I coated the stock with Sutherland-Welles tung oil wiping varnish medium gloss that was also tinted with LMF walnut stain. I applied it with a brush and then sanded the stock with 220 grit paper to create a slurry of finish and sawdust on the surface. That will fill the grain quickly and reduce the number of finish coats required. Here is the stock with the slurry dried to a crust.
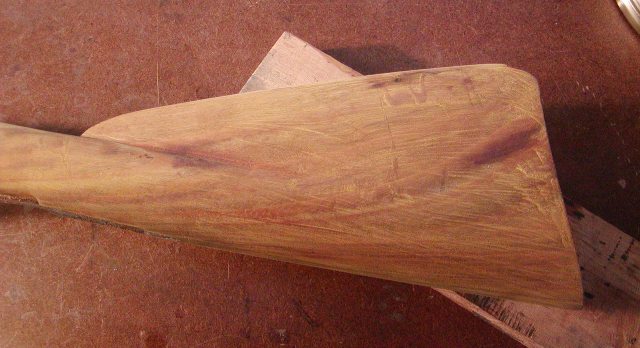
It does not look like American black walnut anymore does it? Anyway, I will sand it smooth and apply more finish tomorrow.
dave
Got more done. First let me discuss the lock. This post will have a lot of technical details. It will require careful reading but if you do that, you will learn some things pretty fundamental to good muzzleloading gunsmithing that you probably will never read anywhere else. The Ferguson lock is a standard design used on modest quality sporting guns of the time (1770s) and produced to a more robust military standard. The TRS version has two features very different from the originals. The cast in engraving is of much higher quality than found on the originals. The manufacture of the original guns was hurried and the crown engraving on the locks was very crude. So crude that if I ever duplicated it for a client, they would accuse me of shoddy work. The other difference is the lock plate bolster is much thicker than the originals and the trigger slot in the trigger plate is too centered. On the originals, the bolster was much thinner and the trigger much more to the right (toward the lock) of the trigger plate. However, TRS did not mitigate those changes by lengthening the sear bar so it fully overlaps the trigger bar. As a result, the sear barely overlaps the trigger bar. It is so close that you could install the lock, tighten down the lock screw and still have it not slide over the trigger bar. So, despite the lock coming assembled and heat treated, I will weld steel on to the sear to give more clearance and strength and then I will case harden and temper all of the internal parts again. I don't want the fit of the sear over the trigger to be marginal in the slightest so the owner never has to worry how he installed the lock. Another issue. The sear moves up and down when the lock is pulled from rest to half cock and then full cock. The sear drops lowest on the lock plate at half cock so the problem is to make a trigger arrangement that allows a solid half cock engagement but also a full cock where the trigger doesn't rattle and there is a lot of trigger creep. The problem on this lock is that the half cock notch is too deep. However, I don't want to fool with that because the other tumbler geometry is good. This style lock does not have a fly detent. That means it is a challenge to adjust the trigger and lock to have a light, crisp pull. The critical feature here is the lock tumbler and the design of the half cock and full cock notches. Without a fly detent, the lip of the halfcock notch must be lower then the lip of the full cock notch. That way, when the sear is pushed up by the trigger bar and releases the tumbler, the sear is far enough away from the tumbler not to hit the lip of the half cock notch. The lighter the trigger pull, the more important that geometry is, which is why fly detents are essential for set triggers. Here is a diagram. Distance A must be less than distance B or the lock risks catching in half cock when fired.

The TRS assembled lock satisfies that geometry and I don't want to fool with it trying to adjust the depth of the half cock notch. So I devised another solution involving a light trigger spring that keeps the trigger bar against the sear of the lock despite its position.


It does the trick perfectly but is by no means a feature on any of the original rifles. It is a means for me to give the owner a good, crisp, safe, and light trigger pull.
I painted the stock with yellow aniline dye that was not scraped off. That color eliminates the cold grey-purple-brown of much American black walnut and turns it into English walnut. I coated the stock with Sutherland-Welles tung oil wiping varnish medium gloss that was also tinted with LMF walnut stain. I applied it with a brush and then sanded the stock with 220 grit paper to create a slurry of finish and sawdust on the surface. That will fill the grain quickly and reduce the number of finish coats required. Here is the stock with the slurry dried to a crust.

It does not look like American black walnut anymore does it? Anyway, I will sand it smooth and apply more finish tomorrow.
dave
- Joined
- Nov 26, 2005
- Messages
- 5,283
- Reaction score
- 11,263
Hi,
I sanded the stock smooth with 320 grit paper, cleaned it off, and then applied more finish. I tinted the finish with LMF walnut stain and alkanet root infused in mineral spirits. That, along with the yellow dye completely wipes out the cold color of so much American black walnut and turns it into English walnut. As you can see, the stock no longer looks like black walnut. It is a hard to get the color right under artificial lighting but you can get the idea under the fresh wet finish, which was wiped dry completely a few minutes after I took these photos.
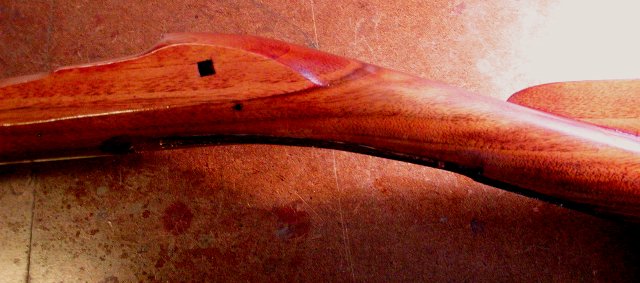
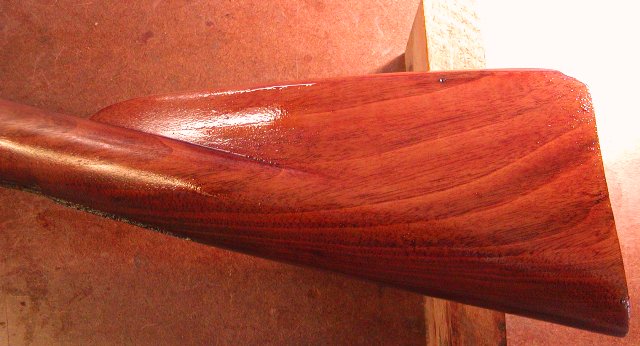
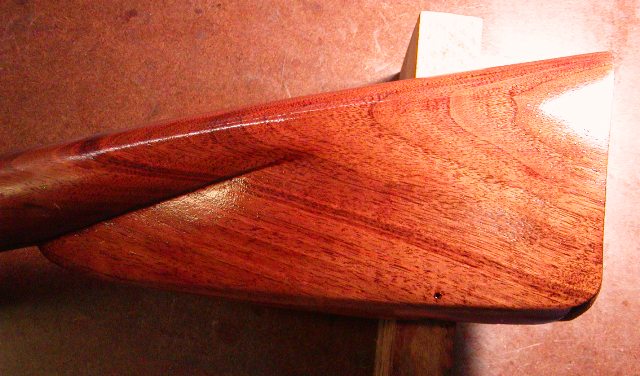
The finish is Sutherland-Welles polymerized tung oil wiping varnish in medium sheen. This is polymerized tung oil mixed with urethane varnish. It dries very fast but you must apply it carefully. Paint or wipe it on, let sit for 10-15 minutes, and then wipe all excess finish off. Get into every nook, cranny, and corner to remove the excess finish. My first coats are tinted and thinned with mineral spirits to seal the stock. After a few coats, I use unthinned finish.
I installed the sights on the barrels. The front sight was typically brazed to the barrel after filing a little flat for the base. Instead, I filed a dovetail into the base of the sight and dovetailed it into the barrel. I also soldered it in place using the dovetail to simply hold it on the barrel while I sweated silver bearing solder under it. The dovetail is very shallow on the round barrel so the solder is a good idea.
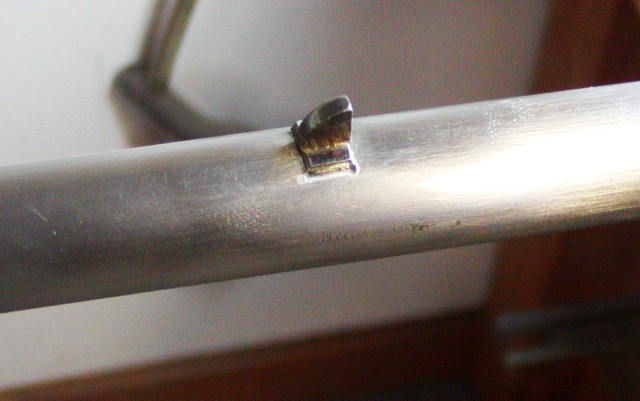
It is mounted 4 3/8" back from the muzzle and abreast the end of the nose cap. That way it does not interfere with the bayonet. Windage adjustment comes from moving the rear sight. I installed the rear sight, dovetailing it in place. It has a leaf for longer distances. It is mounted 4 3/4" - 5" forward of the end of the barrel and breech.
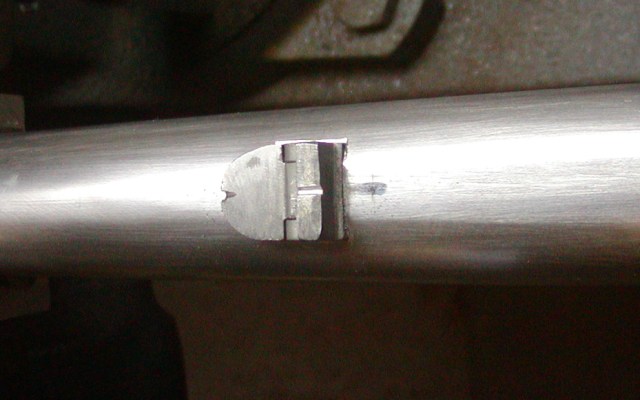
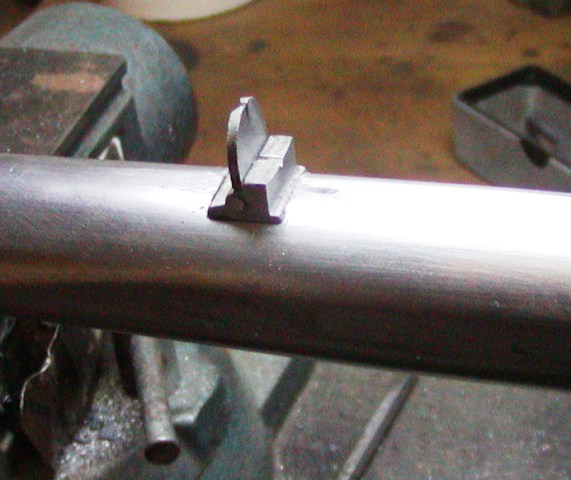
On the Morristown gun, the leaf is missing but it remains on the Milwaukee gun. On that rifle, the round topped leaf is squared off a bit with a notch and the sight just has the one additional sight position. On my personal Ferguson, I did the same thing but made that folding leaf even flatter on top so I had a lower sight for up to 100 yards and the leaf for 150-200 yards. However, there are 2 other options to consider. Midway between the notch on top of the leaf and the top of the lower sight, you could drill a hole and create an interim distance notch, just like some of the sights used on model 1863 Springfield rifles. Alternatively, for shooters with older eyes, you could drill a peep sight through the leaf replacing the lower notched sight. I'll discuss that with the owner.
I also mounted the bayonet lug under the barrel near the muzzle. The lug provided had a curved base intended to be simply brazed of soldered to the round barrel. On the originals, that lug is fitted into a little flat filed in the barrel and then soldered or brazed. That is what I did. I filed a tight fitting flat groove in the barrel, fluxed the bottom of the lug and the barrel, tapped the lug in place so it stuck in the tight slot, and then sweated low temp silver bearing solder into the joint. In a future post I will discuss how to fit the bayonet properly like you mean it for use.
dave
I sanded the stock smooth with 320 grit paper, cleaned it off, and then applied more finish. I tinted the finish with LMF walnut stain and alkanet root infused in mineral spirits. That, along with the yellow dye completely wipes out the cold color of so much American black walnut and turns it into English walnut. As you can see, the stock no longer looks like black walnut. It is a hard to get the color right under artificial lighting but you can get the idea under the fresh wet finish, which was wiped dry completely a few minutes after I took these photos.


The finish is Sutherland-Welles polymerized tung oil wiping varnish in medium sheen. This is polymerized tung oil mixed with urethane varnish. It dries very fast but you must apply it carefully. Paint or wipe it on, let sit for 10-15 minutes, and then wipe all excess finish off. Get into every nook, cranny, and corner to remove the excess finish. My first coats are tinted and thinned with mineral spirits to seal the stock. After a few coats, I use unthinned finish.
I installed the sights on the barrels. The front sight was typically brazed to the barrel after filing a little flat for the base. Instead, I filed a dovetail into the base of the sight and dovetailed it into the barrel. I also soldered it in place using the dovetail to simply hold it on the barrel while I sweated silver bearing solder under it. The dovetail is very shallow on the round barrel so the solder is a good idea.

It is mounted 4 3/8" back from the muzzle and abreast the end of the nose cap. That way it does not interfere with the bayonet. Windage adjustment comes from moving the rear sight. I installed the rear sight, dovetailing it in place. It has a leaf for longer distances. It is mounted 4 3/4" - 5" forward of the end of the barrel and breech.


On the Morristown gun, the leaf is missing but it remains on the Milwaukee gun. On that rifle, the round topped leaf is squared off a bit with a notch and the sight just has the one additional sight position. On my personal Ferguson, I did the same thing but made that folding leaf even flatter on top so I had a lower sight for up to 100 yards and the leaf for 150-200 yards. However, there are 2 other options to consider. Midway between the notch on top of the leaf and the top of the lower sight, you could drill a hole and create an interim distance notch, just like some of the sights used on model 1863 Springfield rifles. Alternatively, for shooters with older eyes, you could drill a peep sight through the leaf replacing the lower notched sight. I'll discuss that with the owner.
I also mounted the bayonet lug under the barrel near the muzzle. The lug provided had a curved base intended to be simply brazed of soldered to the round barrel. On the originals, that lug is fitted into a little flat filed in the barrel and then soldered or brazed. That is what I did. I filed a tight fitting flat groove in the barrel, fluxed the bottom of the lug and the barrel, tapped the lug in place so it stuck in the tight slot, and then sweated low temp silver bearing solder into the joint. In a future post I will discuss how to fit the bayonet properly like you mean it for use.
dave
- Joined
- Nov 26, 2005
- Messages
- 5,283
- Reaction score
- 11,263
Hi,
The bayonet for the Ferguson rifle has a 25" blade and is set up to function as both sword and bayonet. When attached to the rifle, the total length of rifle and bayonet is about the same as the short land pattern Brown Bess musket with its 17" bayonet. It is a fearsome weapon and it deserves to be mounted correctly. I fit socket bayonets like you mean to use them rather than have them as a prop. I hate bayonets that rattle on the gun barrel and fall off easily. Bayonets were hand fitted to every British military gun that mounted them. They were marked to match markings on the gun on to which they were fit. The lug brazed or soldered on the barrel of the Ferguson is located on the bottom of the barrel and positioned so that at least 1/8" of barrel protrudes through the socket of the bayonet when fully seated on the barrel.
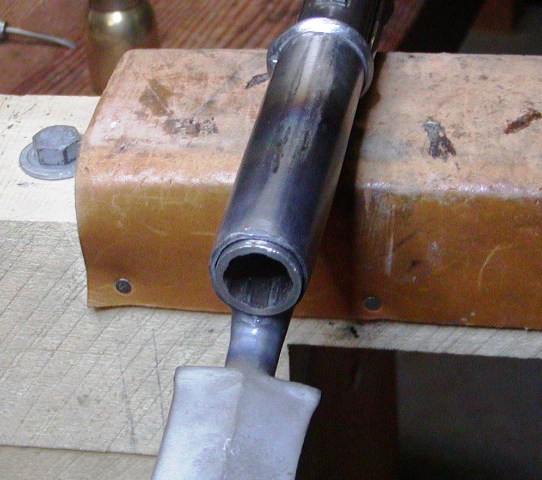
That way, the socket slides snugly up the taper of the barrel and is well supported at both ends. The TRS cast bayonet requires the "L" slot and the slot under the reinforcing collar to be filed to fit the lug on the barrel. As you fit the bayonet, file the end of the "L" slot a little longer and tapering. That way it snugs down on the lug when fully seated.
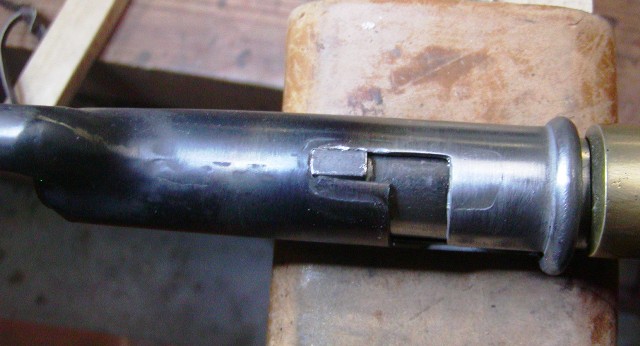
Sometimes it is necessary to peen the edges of the slot to close them a bit. Finally, if the front of the socket rattles on the barrel, peen the end down and over a little closing the hole a bit. The carefully file it so it fits snug on the barrel. You may need to hat the steel red hot to do that. Then clean up the peen marks and polish up the bayonet with both edges somewhat sharp but with a sharp point. If you have the facility, harden and then temper the blade. When fitting, make sure the ramrod fits behind the bend of the bayonet. It is best to fit the ramrod to the gun after the bayonet is mounted.
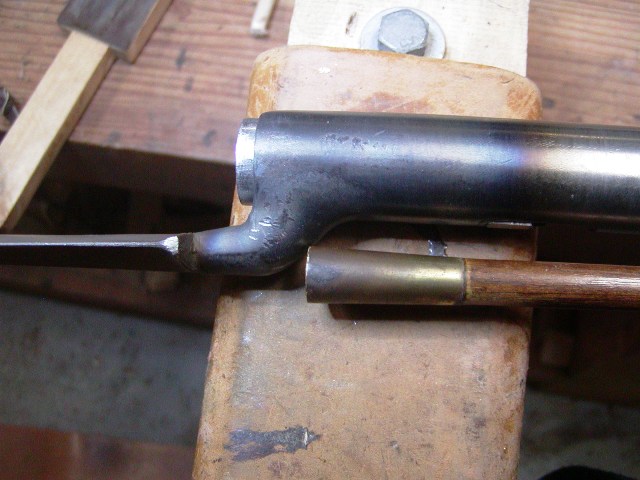
You want the bayonet to fit snugly such that to remove it, you have to tap it upward with the palm of your hand to loosen it. Then you will be ready for battle.
dave
The bayonet for the Ferguson rifle has a 25" blade and is set up to function as both sword and bayonet. When attached to the rifle, the total length of rifle and bayonet is about the same as the short land pattern Brown Bess musket with its 17" bayonet. It is a fearsome weapon and it deserves to be mounted correctly. I fit socket bayonets like you mean to use them rather than have them as a prop. I hate bayonets that rattle on the gun barrel and fall off easily. Bayonets were hand fitted to every British military gun that mounted them. They were marked to match markings on the gun on to which they were fit. The lug brazed or soldered on the barrel of the Ferguson is located on the bottom of the barrel and positioned so that at least 1/8" of barrel protrudes through the socket of the bayonet when fully seated on the barrel.

That way, the socket slides snugly up the taper of the barrel and is well supported at both ends. The TRS cast bayonet requires the "L" slot and the slot under the reinforcing collar to be filed to fit the lug on the barrel. As you fit the bayonet, file the end of the "L" slot a little longer and tapering. That way it snugs down on the lug when fully seated.

Sometimes it is necessary to peen the edges of the slot to close them a bit. Finally, if the front of the socket rattles on the barrel, peen the end down and over a little closing the hole a bit. The carefully file it so it fits snug on the barrel. You may need to hat the steel red hot to do that. Then clean up the peen marks and polish up the bayonet with both edges somewhat sharp but with a sharp point. If you have the facility, harden and then temper the blade. When fitting, make sure the ramrod fits behind the bend of the bayonet. It is best to fit the ramrod to the gun after the bayonet is mounted.

You want the bayonet to fit snugly such that to remove it, you have to tap it upward with the palm of your hand to loosen it. Then you will be ready for battle.
dave
nchawkeye
58 Cal.
Excellent, thanks for posting!!
That’s a long poker thing!
Dave's attention to detail and function never ceases to amaze me. I hereby christen him with the TMF name of "Detail Dave". 
Sam squanch
69 Cal.
- Joined
- Oct 9, 2019
- Messages
- 3,312
- Reaction score
- 4,740
Is the inside of the bayonet socket polished to not scratch the outside of the barrel?
Similar threads
- Replies
- 1
- Views
- 1K
- Replies
- 5
- Views
- 3K
- Replies
- 50
- Views
- 10K
- Replies
- 11
- Views
- 3K


