• Friends, our 2nd Amendment rights are always under attack and the NRA has been a constant for decades in helping fight that fight.

    We have partnered with the NRA to offer you a discount on membership and Muzzleloading Forum gets a small percentage too of each membership, so you are supporting both the NRA and us.

    Use this link to sign up please; https://membership.nra.org/recruiters/join/XR045103

Parts Kit Build By A Beginner(Running Thread)

Muzzleloading Forum

Help Support Muzzleloading Forum:

This site may earn a commission from merchant affiliate links, including eBay, Amazon, and others.
I considered checking the depth of the ramrod channel for just that reason. Here was my dillema with the trigger inlet
100_1415.jpg


didn't have a lot of options where the trigger or tang bolt located. I still can shorten the trigger plate if I need to as it is only flush inlet. The trigger guard inlet will cover for any shortening of the trigger plate.

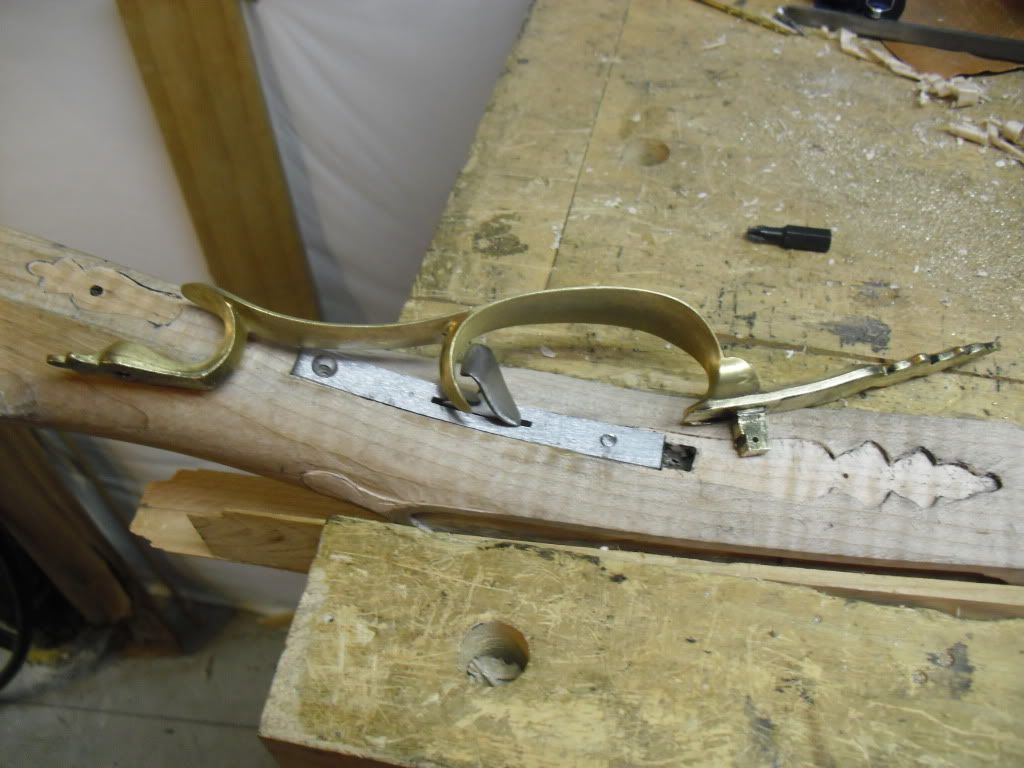
Here is a pic of the full trigger guard
100_1386.jpg
 
the bottom of page 62 in "Recreating the American Longrifle" shows an example of the trigger guard attached to the trigger plate via screws... why not attach the front of the trigger guard to the trigger plate and the rear with a pin or screw?
 
Vtsmoker said:
Got the threads cut on my trigger plate and lock plate and everything fit together fine. Now for a question on the trigger guard. I know the trigger plate has to go down a little further.
100_1438.jpg


The front lug for the trigger guard falls right over where the tang bolt comes into the trigger plate.
100_1436.jpg

Do I just cut this lug off and use a screw for the front finial. Also, the lug to the rear of the loop...do I cut the rear of the trigger plate to be able to pin that lug? If I do that the rear screw for the trigger plate will be visable.

neither......drill and file 2 slots in the trigger plate metal for the brass lugs to pass thru...... :hmm:
put yer' plate in the wood, then your cast lugs go thru the slots! :idunno:
it works!
 
I understand you have to put it where the inlet is, but you have the triggerplate about 1/2" to 3/4" too long in the front. I would have cut the triggerplate off about where your tang screw hole is & left just enough room for the screw to pass the pin boss.

And I probably would still cut that excess off, glue in a piece of wood, if that is what it takes to get that guard lug in. the wood. Also looks like the lug needs to be longer too.

If the RR hole is going to be where the lug is, glue a 1/2" piece of RR down in the end of the RR hole, let dry, then inlet the lug thru the place you filled.

Oh, and you pin all 3 lugs on that triggerguard.

VERY important if you have a cast off, the tail of the guard follows the Stock center towards the toe...... If you have to bend it to do so, you bend it right after the bow.... then go straight down towards the toe.

Keith Lisle

Note: Just because someone built one 200 years ago with the guard screwed to the triggerplate doesn't mean it was a good way to do it...... :shake: it just means someone did it.....
 
Thanks guys. I know I still have some work to do in the trigger area I just wanted to get some input before I went too far. Guess you think I already did :idunno: . I hope I'm not being too much of a PITA. My hope is this thread will not only help me get through this build but also guide others. I can't thank you all enough for sharing your knowledge and experience with me.
 
CIMG0791.jpg

Here's the way I did mine. I'm learning, just like you, so this may not be the way the masters here would do it, but it's the way I did it. The lug is cut in half, because it would interfere with the trigger plate, and I notched out the guard at the point it touches the trigger plate so that I could inlet the guard down.
I hope I'm helping.
 
I really like these post and the comments. They all certainly help me in my project. :hatsoff:
 
In case you are wondering how you are going to glue a 1/2" piece of RR down in the end of a RR hole & not have glue all over everything....... :hmm:

Mark your Lug inlet where it will be.(For Sure) We will say the lug IS going to hit the end of the RR hole. Drill a 1/8" hole in the center of the lug mark on the stock, into the RR hole. Squirt some Elmers Stainable Wood Glue into the hole. (Don't go cvrazy with it.

Now take your 1/2" long RR piece & start it into the RR hole, Now put yer thumb over the 1/8" hole ya drilled into the stock, take a RR & push the 1/2" plug into place.
When you push it home the glue will be forced around the 1/2" RR piece. Take your thumb off the hole, wipe up any excess, take the RR out & wipe off any excess glue of it.

Now take a piece of Saranwrap or Waxed paper & put over the 1/8" hole, back it with a small piece or wood or metal, take some electrical tape & tape it tight.

Stand the stock Vertically over night & in the am it is dry & you can go on with yer rifle.

Keith Lisle
 
Well I got the trigger guard thing figured out. Thanks for all the tips. Heres what I did. First I measured to see where the bottom of the ramrod channel was. Then I set the trigger guard and marked where the lugs had to be relocated to. I cut the lugs and silver soldered them in place. That was easier than I thought it would be.

Before:
100_1436.jpg


After:
100_1444.jpg


Then I cut about 1/8 of an inch off each end of the trigger plate and marked the lug locations. The ramrod channel ends at the points of the finial right in front of the lug inlet( this pic is after I inlet the guard but wanted to show how much room I had between the front lug and ramrod channel)

100_1443.jpg


Next I inlet the trigger plate down a little more to make room for the trigger guard inlet.
100_1442.jpg


Then inlet the trigger guard
100_1443.jpg


Heres how it all looks
100_1445.jpg

100_1446.jpg
 
Mike Brines said:
CIMG0791.jpg

Here's the way I did mine. I'm learning, just like you, so this may not be the way the masters here would do it, but it's the way I did it. The lug is cut in half, because it would interfere with the trigger plate, and I notched out the guard at the point it touches the trigger plate so that I could inlet the guard down.
I hope I'm helping.
looks like he did...
 
Ok. Been away from the build for a couple weeks due to the holidays and family visiting. In the mean time I ordered a new sideplate from TOTW as the one that came with the kit was too short for the front lock bolt.

100_1474.jpg


Well, the one I got from Track seems to be too long! I'm using an RC Davis round face lock. this is the side plate I got from track.

100_1475.jpg


The double lines are where the front lock bolt goes. Short of making my own plate any ideas???
 
Vtsmoker said:
Short of making my own plate any ideas???

Well, if you don't want to make your own, it seems you're destined to buy one that fits.
Keep in mind the pictures in the TOW catalog are "lifesize" - true to scale - that might help you find one that fits.

If you don't have a TOW catalog, you can either (1) order one, or (2) post your exact center-to-center measurement here and maybe someone will suggest a plate that fits.
Or, better yet, call one of the many suppliers repeatedly mentioned here (Tip Curtis, Troy Roope, Dave Keck, etc etc) and tell 'em what you need.

You might give making your own a second thought - it's not hard, and you'll get that warm glow of self-satisfaction when you're done !
yes.gif
 
With only one hole drilled and nothing inlet it would seem that you could find something close enough, I would keep looking or contact some of the folks recommended with the dimensions you have to work with the true size pics in then TOW catalog are great for this and is worthwhile to have around for other items even if just for reference
 
Make it, Or ask R.E.Davis what sideplate they have to go with that lock...

:idunno:

Keith Lisle
 
Back
Top