• Friends, our 2nd Amendment rights are always under attack and the NRA has been a constant for decades in helping fight that fight.

    We have partnered with the NRA to offer you a discount on membership and Muzzleloading Forum gets a small percentage too of each membership, so you are supporting both the NRA and us.

    Use this link to sign up please; https://membership.nra.org/recruiters/join/XR045103

Parts Kit Build By A Beginner(Running Thread)

Muzzleloading Forum

Help Support Muzzleloading Forum:

This site may earn a commission from merchant affiliate links, including eBay, Amazon, and others.
Just out of curiosity, how do you know the LOP to acquire if you don't have the trigger in ? Or are you just taking what the LOP they gave you & going with it ? :hmm:

Most would do it like this:

Get the Lock in place.

Then barrel where it needs to go.....

Then when you have the barrel in place & pinned to the stock, tang should be in & down & where you want it.

Then do the trigger, then the tang bolt.

Then LOP set for the buttplate.

Keith Lisle
 
I'm going with the LOP they gave me which is about 13 1/2. Just right for me actually. Remember, this is a pre-carve stock. Most everything is where it is. I don't feel like I'm rushing through this. There's alot already done for me. I do think it's alot harder to "touch-up" a pre-inlet than just do the inlet from scratch :idunno: . In your opinion where and how am I rushing. If I'm doing something wrong your advise is much valued.
Thanks Mark
 
Well, I hope your right.

The stocks provided by Pecatonica River always have about 2 1/2 to 3 inches of extra wood at the butt.

Then again, I have never asked them to make the cuts to fit a butt plate on a stock that I have bought from them.
 
Heres the pic of the butt plate comb inletted
100_1413.jpg


I measured from the center of the butt plate to where the trigger is pre-inlet
100_1414.jpg
this is good for me.

Now for my next hurdle...setting the trigger. The hole where the sear pin(correct term??) appears in the inlet, the trigger hits wood that I need to remove so it will hit the pin right? The black dot is where the trigger hits.
100_1415.jpg

Do I remove this wood? Also the trigger looks like it needs to be reduced or is it shaped correctly. Where the pencil points in the second pic showes where the trigger is going to hit the pin.
100_1416.jpg
100_1418.jpg
 
When the people who made your trigger designed it they had no idea about what your gun would need so they added extra material to the triggers blade.

Notice that in doing so, they also designed the trigger plate so it would serve as a stop to keep the trigger from rotating too far forward after it was installed.

Feel free to remove as much of that extra material as you wish but I would recommend leaving at least 1/8" behind the point where it will contact the locks sear arm. 3/16 of extra material would be better. Also, when you remove that extra material, leave the material next to the trigger plate as it is so that the trigger will stop on the plate as it now does.

Only after you remove the extra steel from the trigger plate should you determine where the trigger blade will hit the wood.
Then, you can think about removing any wood that will interfere but for now, leave the wood alone.

Eventually, you will also end up having to file or grind some of the top of the blade down so that when the trigger plate is inletted and it's outside surface is flush with the wood, the top of the trigger blade will "just clear" the sear arm when the lock is at half **** and at full ****.

For what it's worth, if the point of the pencil is pointing exactly where the trigger blade will contact the locks sear arm, it is in just about the perfect place for a nice 2-3 pound trigger pull. :)
 
Keep at it. I'm in the same boat you are. If you think your supper critical, look at it from my perspective.

My primary hobby is knifemaking, I have definitely developed the "critical eye", unfortunately I can see every mistake I've made and am half way tempted to order a new stock and start over. But it's like some one told me, no mater how bad, finish your project, it'll always be your first and be a special piece for you. You should see some of my first knives. Heck, you should see my first rifle! I've got it together and everything works, now I'm on the real sweat wringer, trying to get the stock carved and sanded.

On any project some times you just have to walk away for a little while then come back later.
 
Chuck Dixon's book on building rifles shows quite well the variables on trigger positioning on a single trigger.

The trigger installation is always an all day event for me, as I am quite critical on the pull pressure. Regardless of the single or double triggers, I want the single or front tripper weight pull to be around 3 to 3.5#.....
And regardless of what one I use, I always take 1/8" at least off both ends of the triggerplate. By doing so, if I don't have it reasonably close to where I want it, I just grab another trigger & move it & have 1/8" either way I can go & not have a gap to fill. You can add to the existing triggerplate if you have to move it, but easier to grab another trigger asm. & use the initial trigger asm. on the next rifle.

Keith Lisle

PS: Looks to me, if the angle of your trigger stays as it is, your LOP will be about 13 to 13.25", as you measure from the front Center of the trigger to the rear center of the buttplate. The rearward sloping angle of your trigger will lessen the LOP. You can change that slope some, but then the shoe part is not up against the plate as well as it was originally. Another option is a Davis single trigger asm. It has a larger plate & the trigger shoe not sloped back as much.
 
I normally wait till I inlet-then drill and tap the trigger plate. When the lock is in and the trigger plate is in position, you can tell if it's tripping the sear. You just file off a little at a time till you can **** the lock without sear tripping. It's a lot of trial and error, but then you won't have too much slop of the trigger flopping around.
 
Yup. But if you look at the pic the only thing the trigger is going to hit right now is wood :haha:
 
Sure it's hitting the wood now.
Like I mentioned, the trigger was made for any gun you can imagine. The task is to remove the unnecessary trigger blade so it now works for your gun. :grin:

What all of you new builders need to keep in mind is that all of the parts in your kits are just rough material that will need adjusting to suit your guns.

It's kinda like a bunch of boards.
They don't look like a bed or a book case or a fancy chest of drawers but they will after the craftsman trims away the unneeded wood and puts them together. :)
 
Round off the end of the tripggerplate where it is hitting the wood, just take about 1/8" off that point/corner. Take a small gouge or small chisel or even a Dremel & cut out that black mark to about the depth of the hole the in the stock the sear arm is going to go thru.
You blacken the bottom of the trigger & triggerplate with inletting black & inlet it. When you get it inlet flush, you pull on the trigger & mark the wood up inside. Then remove that mark & do it again, til you can trip the sear & not hit wood.

If you slightly bevel the triggerplate it will inlet neater , if you take care on inletting it.
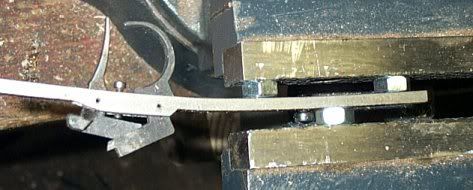
Also you need to bend the triggerplate to the curvature of the stock BEFORE inletting it.

This will give you an idea of one way you can cold bend them if need be.. Dif. trigger asm. but same theory. DO NOT try to cold bend one with a empty pin or screw hole, as it may break there. And minor bends, not major. If you need a major bend, heat it red hot at the bend, torch on the outside of the bend, & bend it.

BendTriggerPlate.jpg


Keith Lisle
 
Keith, not much of a book learner. I can read something a hundred times and not get it. But, show me once and I got it. I ordered a pin and bolt kit from TOTW since my gun didn't come with them. I'll get the barrel pinned when they come in, get the lock bolted in and do the trigger and tang bolt. More pics soon.
 
I forgot to add that you will most likely have to take metal off the top of the triggerbar, as most likely the sear is going to engage it before it lets the trigger asm. down all the way into the triggerplate inlet. Take the metal off the triggerbar a little at a time........ If you take off too much, then you have too much slop when you get done & that is not what you want.

End result is you want just a smidgen of wiggle room on the trigger when you **** it. This allows the sear to fully engage at halfcock & fullcock position & not create a unsafe condition.

If the sear is loaded against the trigger at halfcock or fullcock, with humidity & temp changes, this could cause the sear to not be fully Engaged. Thus somebody could bump the rifle & cause it to discharge & someone get hurt. So, a full engagement of the sear is Always a must & something you should insure.

Keith Lisle
 
BTW sir, your tip about tracing the part to be inletted with an E-XACTO knife worked great. much nicer inlet edge than outlining with a chisel.
THANK YOU!
 
If you do the initial trace with an exacto knife, then wet your finger or thumb & rub across the line all around, that line will darken & you can see it better too.

Keith Lisle
 
While we are mentioning Exacto Knife's, the only part of the blade that really gets any use is the point and maybe the first 1/4" of the edge.

Back when I first started building, while cutting the edges of the mortice I was concentrating so hard on keeping the knife up against the metal part while I stabbed in the outline that I did not notice the blood at first.

Then, when I noticed it I thought, "Why is there red stuff on my wood?"
It took a few seconds to figure out that I had sliced into my finger with the blade.

The moral of the story is, whenever you install a new blade into the handle, be sure to dull up the edge from 1/4" on back to the handle.

This is easy to do with some black wet/dry sandpaper and it will help keep unwanted stains off of your wood. :rotf:
 
:rotf: :rotf: So I was not the only one that did that, huh ? :grin: When I put a new blade in I go straight to the belt sander & sand the rear 1/2 of the blade so it won't cut me.

I also resharpen them every now & then to keep them super sharp. A lil oil on a fine Arkansas hard oil stone will hone them up.

Keith Lisle
 
It's good to hear I'm not alone.

Those damn blades are so sharp they can really cut fingers quickly and you won't even feel any pain.

That's why I bled all over the stock without realizing that I was leaking. :shocked2: :rotf:
 
zonie when i get my Jim Chambers Virginia im coming to stay with you for a few weeks. VTSmoker is freaking me out man...

VT, the only advise i can give you is to just put your tools down and sit and stare at your project for a few hours and then make one or two moves then stop... rinse and repeat... be proud of every single thing you do. dont do a bunch of stuff and then regret it... also its not a race. you have a large investment sitting there and you should be enjoying the build not becoming angry or upset... its going to be OK!!! your scaring the rest of us new guys to death...
 
Back
Top