Practice carve for 1st longrifle

Muzzleloading Forum

Help Support Muzzleloading Forum:

This site may earn a commission from merchant affiliate links, including eBay, Amazon, and others.

suzkat

40 Cal.
Joined
Oct 26, 2010
Messages
428
Reaction score
2
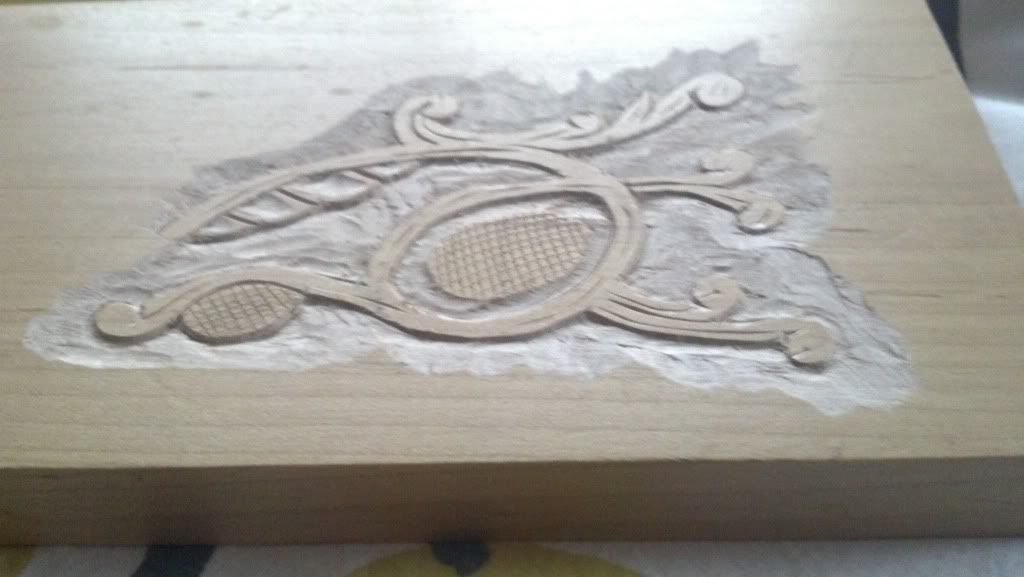
Here is the beginning of a practice carve I plan for my first longrifle, based on a Solomen Kempf
western PA rifle. This is really hard to do, but alot of fun. Took 2 hours to get this far and it has lots of mistakes, but I learned alot in those 2 hours. Sharp tools and thoughts are required.
Carve.jpg
 
Lookin' good! I learned that you have to think ahead a bit and make sure you don't make mistakes in the overlaps. Next try to level the background. I use rifflers, those cardboard nail files, and offset flat chisels. :thumbsup:
 
:shocked2: if it isn't sharp enough to make you worry about useing it yourself, its not sharp enough--just an old adage that comes to mind when wood working, YMHS Birdman :thumbsup:
 
Not bad for a first try, but it needs much refinement. The centered oval, needs to be more oval without the hiccups. Don't detail or mold the cut in the layout until it's borders are trued up. Get your penciled border true before cutting, then cut true to it. Very true to it. The back grounding is as important as the raised portion, and can make or break what you have as raised. I see many lines that waver in width, and others that begin thick, then taper to small. That needs, in most cases, to be reversed. The very top C that aims left, is a good example. It is too thick at it's beginning. The very bottom right is a 90° extension. That particular one should flow smoothly out from the main stem, in a narrower base, getting wider as it goes. Do some further study of carving designs before you start your stock, and practice drawing. Practice a lot. We all have to. As in engraving, the finished result will only look as good as the design, no matter how skilled you become. One simple thing to remember. The eye hates parallel lines. Sometimes they are necessary to the design, but are to be avoided whenever possible. Keep going. You're doing better than many beginners I've seen.
 
Wick, Great feedback and much appreciated. This was a 2 hour practice session and I learned alot and have alot more to learn. I was essentially getting used to the tools which I have never used before. I'm not going to go any further with this one because the basic structure is not there, so I will start with a new drawing that is done more carefully to incorporate your suggestions. I also think that I will work on partial carvings ie. a fleur de lis by itself, so I can try to make it perfect like I want it to be on the rifle. Thanks for the help.
 
Find pics of what you know is good carving, and study what the carver did, and how he treated areas you might have a problem with. As best I can guess, you are using the stab in method. That is a good method and was used by John Bivins. I found it easier to get good results with. "GUNSMIHING TIPS AND PROJECTS" is a good book with 4 or 5 chapters by John Bivins, 2 0r 3 of which are how tos on carving and shaping.
 
Just a friendly word of advice from an an old and longtime woodcarver----your pencil and eraser are the first tool to be used before any work takes place and immediately right after----it is your primary tool---use it. Good luck :thumbsup: "Doc"
 
Wick, Not sure what you mean by stab in method.
I used a V gouge along my lines and then round gouge and and angled flat tool to cut away the
excess. Is the stab in method pushing a knife blade along the line down into the down and then
cutting over to that line to remove the excess. A friend showed me that method for inletting locks, but I watched a video of one of the masters
doing the V gouge method and he did it so slick I thought that was the optimum way. Please describe
Stab In Method. Thanks
 
Ezekial, Not sure what you mean by using the pencil immediately after the work?
Rob
 
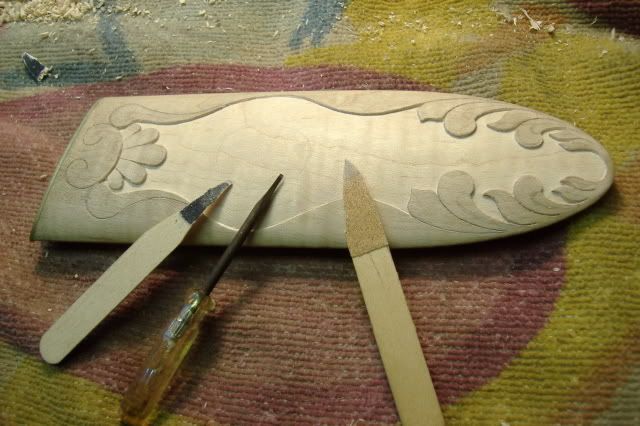
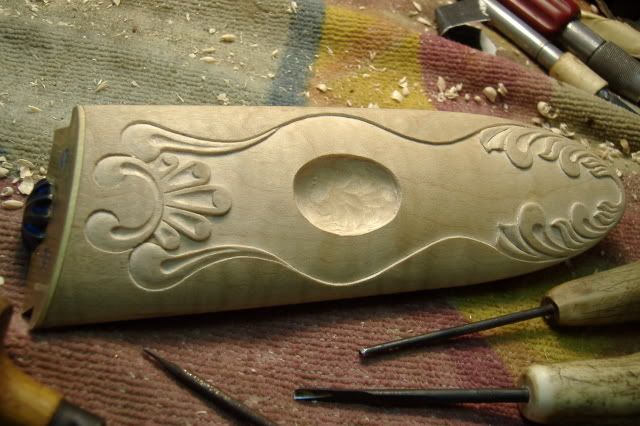
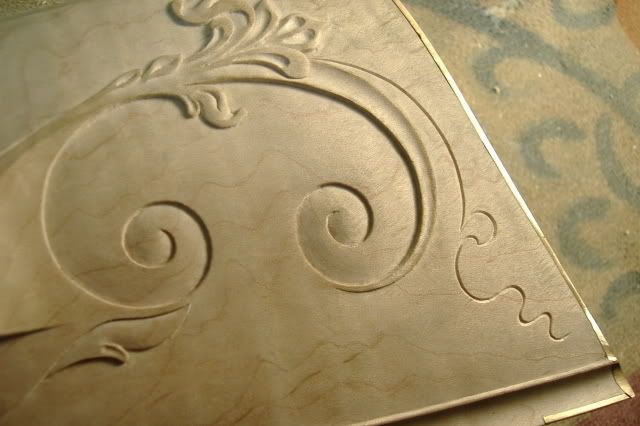
Yes, that is basicly the stab in method. Many use little chisles, sometimes made from hack saw blades. I use an Exacto knife. It is a matter of prefence as to the method, although the stab in is faster to master, for most beginners, and little chance of a slip. Here are pics of a carving in progress. I use a tiny chisle made from a screwdriver and mounted in a graver handle to take out much of the back ground, and sanding sticks to smooth it.

pennyknife084_640x480.jpg
[/img]

pennyknife085_640x480.jpg


pennyknife087_640x480.jpg


pennyknife094_640x480.jpg
 
Beautiful work. Thanks for the tips. My friend Randy Weitzel also uses Xacto blades to stab in and he rounds the ends of them so he can rock the
blade into the wood. It gives him alot of control on his inletting work and kinda squishes the wood away from the blade. Then if there is a tiny gap, a touch of water will swell the squished wood around the inlay. This will only tighten up very small errors but works well.
 
Simply beautiful. Can't wait to see the final product. :thumbsup:
 
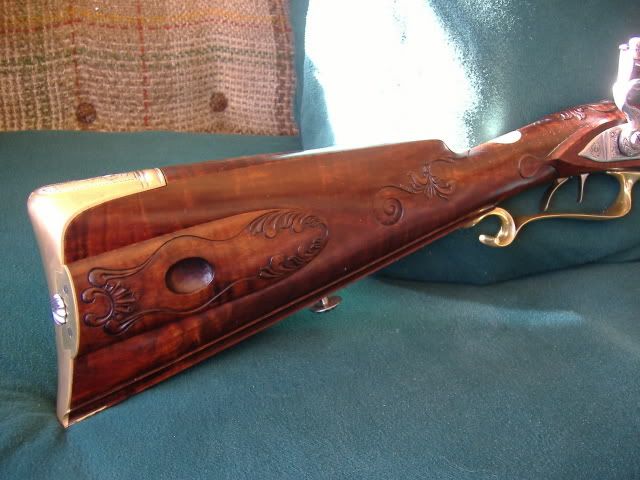
It was finished about 4 years ago, and I have been too busy making knives to do another. Not a great photo.

pennyknife212_640x480.jpg
 
Not a Jaeger. A Christians Springs type, similar to the Edward Marshall rifle. It started out as a Tip Curtis "in the white" rifle that I rebuilt and finished.
 
Man Wick, that is awesome! And a good thread, got a long, long way to go myself, lots of good info here.
 

Latest posts

Back
Top