• Friends, our 2nd Amendment rights are always under attack and the NRA has been a constant for decades in helping fight that fight.

    We have partnered with the NRA to offer you a discount on membership and Muzzleloading Forum gets a small percentage too of each membership, so you are supporting both the NRA and us.

    Use this link to sign up please; https://membership.nra.org/recruiters/join/XR045103

Short starters/ball starters

Muzzleloading Forum

Help Support Muzzleloading Forum:

This site may earn a commission from merchant affiliate links, including eBay, Amazon, and others.
Spence, your rammer picture reminds me of one used for an early breech loader....the name of which I can't remember... :doh: ..something in Polish I think.....a member here owns one...
 
colorado clyde said:
The 19th century manual of land warfare, describes....
Bell Mouth
A widening of the muzzle of a muzzleloader, it made the gun easier to load and reduced cracks around the muzzle by reducing pressure on the tube's thinnest part.
Fake news. :haha:

That is the title of the book, it was published first in 2001, not 19th century. The definition was written by the author, a contemporary historian.

Spence
 
:thumbsup:

I cast balls and unless they are obviously deformed, they go into the pouch. Patches are cut, generously lubed with bear grease and live in a tin. I put about the same amount of powder in the measure when loading. I never worry about all the minutiae that some obsess about because they aren't important to me.

Despite all these short-comings, my gun puts meat in the freezer. I also only shoot targets with friends for fun - I don't compete.
 
George said:
colorado clyde said:
The 19th century manual of land warfare, describes....
Bell Mouth
A widening of the muzzle of a muzzleloader, it made the gun easier to load and reduced cracks around the muzzle by reducing pressure on the tube's thinnest part.
Fake news. :haha:

That is the title of the book, it was published first in 2001, not 19th century. The definition was written by the author, a contemporary historian.

Spence
:doh: ....I should have checked the copyright date.... :doh:
 
Yeah I have wood and brass measures that hold a volume of powder that I calabrated using salt and have no ideas what it wieghs. Fill and tap it flat and charge. I never have weight a ball and choose patching by feel I have never miched it. It just feels like the .15 when I had bought it. I've fed my smoothies all sorts of wads and don't have any pre made fiber wads or over powder wads.
I can never get the best out of my gun, but it makes meat and has always won a prize in a shoot ( blanket shoot :haha: )
 
SgtErv,

As to Barrel or Muzzle “coning,” I think you may be mistaking terminology. Don’t feel bad, though, because even today people often use incorrect terminology and that includes people in the gunsmithing trade. To better explain it, I think we should go over how the muzzle end of the rifle or gun barrels were finished in the period and now.

So we are all on the same page, I would like to use the common term for the end of the barrel as the “Barrel Face.” We now know that if the face is not uniform to the bore, no matter the shape of the face, the gas coming out of the bore will drive the bullet away from the line of the bore and “throw the bullet off” just as it exists the muzzle. There is no doubt in my mind that they realized this in the period even if they did not understand all the science behind it. The common shape of the face of the few 18th century rifles I have seen and most early 19th century rifles was flat. This was fairly easy to do when they went from swamped barrels to straight barrels because with a straight barrel, you can place a Square along the barrel flats to see if the barrel face is perpendicular to the sides. However, with a swamped barrel where the barrel flats are not uniform OR on a tapered round barrel, you really can’t use a Square. OK, so how did they ensure the muzzle face was uniform to the bore?

One might suggest they put a barrel in a lathe between live centers to use a cutting tool to face the end of the barrel. Rudimentary versions of such lathes did exist in the 18th century, but the length and weight of rifle barrels AND the fact the swamped sides of the barrel were not parallel, all would have made this extremely difficult if not improbable or even impossible. So how did they do it in the 18th century? Well, since I have done this work by hand on modern barrels and some muzzle loaders, the easiest way for them to have done it would be to make a piloted cutter where the cutter’s pilot just fit into the bore. So, did they have a piloted cutter like that in the 18th century? The answer is a resounding YES.

Denis Diderot edited/published a “Encyclopaedia, or a Systematic Dictionary of the Sciences, Arts, and Crafts” with one engraved plate on a gunsmith’s work that is germane to this discussion. Please see the tools listed below in the linked engraved plate.

Figure 33 appears to be a cone shaped tool for “crowning” or “chamfering” the bore at the muzzle
Figure 32 (to the immediate right of Figure 33) appears to be a Muzzle Facing Tool or at least a piloted cutter to cut a flat face that is perpendicular to a bored hole

BTW, you can click on the link and it will enlarge to see the individual tools better. http://artflx.uchicago.edu/images/encyclopedie/V18/plate_18_9_4.jpeg

OK, so a tool such as “Figure 32” would cut the barrel face perpendicular to the bore in the barrel. That left a sharp edge all around the outer edge of the bore that could/would catch on or shave the ball during loading or cut the patch. To get rid of that sharp edge, a tool such as Figure 33 would be used to lightly chamfer/crown the bore at the muzzle. That put an angled surface all around the bore at the Barrel Face. This chamfering/crowing is not “coning,” as coning actually cuts down further into the bore. However, some folks have mistakenly used the term “coning” for what was actually Barrel Crowning/Chamfering

There was also another type of Bore Chamfering that was done at times in the 18th century. Instead of a tool like Figure 33, this was done with small files and probably very carefully by hand. The grooves of the bore were filed at the muzzle so there was a rounded edge on them and deeper than the lesser amount of rounding that was done on the lands. This also acted to allow the patch material to “ease” into the bore, as the patch material was squeezed into the grooves, instead of having to compress in a very short distance of the bore from the muzzle.

Gus
 
Last edited by a moderator:
Artificer said:
... The grooves of the bore were filed at the muzzle so there was a rounded edge on them and deeper than the lesser amount of rounding that was done on the lands. This also acted to allow the patch material to “ease” into the bore, as the patch material was squeezed into the grooves, instead of having to compress in a very short distance of the bore from the muzzle.

I have one rifle with this feature and even though I have a fairly tight patch/ball combo, I can press the ball flush with the muzzle by thumb pressure. If I really choke up on the ramrod for the initial push, I can dispense with a short starter. :thumbsup:
 
First, thank you for the information on actually using the hand filed crown mentioned above. I've never owned a rifle that was crowned that way and found your experience interesting.

Spikebuck said:
Artificer said:
Figure 33 appears to be a cone shaped tool for “crowning” or “chamfering” the bore at the muzzle

The tool in Fig 33 has no "bore guide." Would it not be just as important to have a perfectly concentric and squared up "crown?"

Oh, boy, my personal answer to that may touch off a firestorm, but I will give it a go.

I spent a career building and maintaining NM suppository rifles and we definitely found it absolutely necessary to "touch up the crown" or cut just a bit more with a piloted crowning tool every 400 to 600 rounds fired - to keep their gilt edge of accuracy.

However, I don't have the evidence to prove this is anywhere near as necessary on a PRB or Minie' Ball muzzleloading Rifle used for target shooting. As far as I have been able to find so far, this was not something done often in the period. BUT since they so often "freshed" the rifling during the 18th and earely 19th century on PRB Rifles, it may not have been anywhere close to being as necessary.

When I purchased my own very expensive 12 flute carbide Muzzle Crowning Tool, I made some pilots that fit some PRB bores and especially some Mimie' WBTS era rifles, to try to get some evidence one way or another. However, I could not get accurate round counts from even the best NSSA shooters I did this to their rifles, so I can't say how much it helped or not.

Gus

.
 
P.S. to my post above. I have looked at quite a few of the crowns on muzzle loading rifle barrels from our modern day PRB barrel makers and found them to normally have very good crowns when the barrels are delivered.

Gus
 
I've re-crowned many a ... uhhh mil-surp toy by using SS ball bearings or large brass pan head screws and micro-grit compound; not your typical valve grinding compound.

My rifle muzzleloaders are coned - can't be beat and none have ever lost any inherent accuracy.
 
SgtErv said:
Historically, though, from my understanding most - if not all - rifle barrels were "coned."

So, for those who don't use them, what is your workaround?

I have a .54 L.C. Rice barrel on my rifle and it has his "medium radius crown". Not coned. I use a 0.530" ball and a 0.017" to 0.018" patch. I set the ball on the patch at the muzzle, thumb press it flush, then choke up to the last 2" of my tapered rammer and push it in. Thereafter I push 10" or so at a time until it is seated.

When shooting from a ball-block I occasionally use a 1-1/2" stub starter to push it out the block and into the muzzle. In my little video I just push them out the block and into the muzzle with the rammer end.
 
Artificer said:
One might suggest they put a barrel in a lathe between live centers to use a cutting tool to face the end of the barrel. Rudimentary versions of such lathes did exist in the 18th century, but the length and weight of rifle barrels AND the fact the swamped sides of the barrel were not parallel, all would have made this extremely difficult if not improbable or even impossible.
Well, maybe. Maybe not.

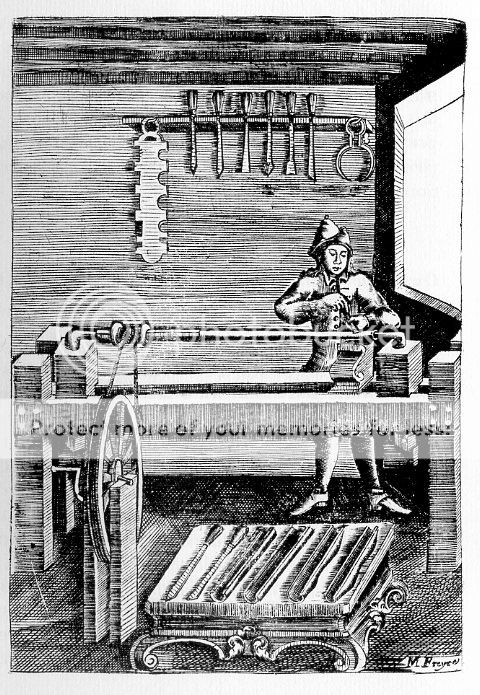
From Espingarda Perfeyta, [The Perfect Gun,] 1718, Portugueses:


There is an entire chapter devoted to turning the barrel on the lathe, entitled "On how the Master must proceed with the turning-lathe on the outside of the Barrels". It is basically instructions for turning a swamped barrel. Notice the turning tools, calipers and multi-gauge on the wall.

In An Essay on Shooting, Wm. Cleator, London 1789, he says, when describing the making of Spanish barrels:

"They do not regulate the thickness of the barrel by means of the compass, but in its room employ round rulers to conduct the file; and finish the outside by turning in a lathe."

Spence
 
Spence,

I loved that picture of the early Portuguese lathe since the first time you posted it. Notice the wooden support underneath the barrel where the gunsmith is filing on the top of the barrel? That is a very rudimentary form of what is today called a “steady rest” to keep the barrel from bending too much while he files on it to shape and smooth the barrel. It is perhaps possible to have a greased leather belt on top of that wooden support to hold the barrel accurately enough to attempt to turn the barrel face so it is concentric with the bore, but even if it would work as good as the piloted cutter shown above, it would be much more difficult to do an accurate barrel facing with it.

Of course the other problem is this kind of wooden support would not work anywhere near as well on a swamped octagon barrel as a round barrel.

The piloted facing tool, on the other hand, does not require any kind of special barrel rest and lathe set up to cut a concentric barrel face no matter the shape of the outside of the barrel. Individual pilots could easily have been made for different calibers and careful wrapping of the pilots with oiled paper would give a greater range for each pilot ”“ just as they used on barrel reamers where the finest barrel cuttings came out like fine face powder.

Gus
 
Artificer said:
Notice the wooden support underneath the barrel where the gunsmith is filing on the top of the barrel? That is a very rudimentary form of what is today called a “steady rest” to keep the barrel from bending too much while he files on it to shape and smooth the barrel.
It is perhaps possible to have a greased leather belt on top of that wooden support to hold the barrel accurately enough to attempt to turn the barrel face so it is concentric with the bore, but even if it would work as good as the piloted cutter shown above, it would be much more difficult to do an accurate barrel facing with it.
What you describe doesn't match what the authors say is happening. I believe what you see as a wooden barrel rest is a tool rest.

"And after the barrel is quite straight within, there shall be placed outside it a wooden reel, on which there is to go a cord, this reel just in the middle of the octagonal part, and well and straight. Thus, with the cord on the reel, the ends of the barrel shall be put into the axels, or vice, of the lathe, oil being put on both parts, so that they run well and are not worn, and then with the narrow-ended firmer, having it secure on the rest, work shall start to turn the barrel at the muzzle, which shall be rounded for two fingers at the end only...."

A firmer is a lathe cutting tool, not a file.

After the barrel at the muzzle and at the octagon-round junction are turned to the same diameter, they say....

"And if it is necessary to use the file, to file the prominences that the iron has pushed up on the lathe, it shall be done until the barrel is perfectly round. When these two parts have the same thickness, the tops of the barrel shall be worked, and with a cutting iron having two bevellers at the sides and a sharp point, those tops of the muzzle and breech shall be turned, for thus the breech-plug will fit better and also the top of the muzzle will be straight, for by eye this cannot be done properly. And these equalities having been done, the barrel shall pass to the bench where it is to be filed."

When he says "top" of the muzzle and breech, he means the ends. His cutting iron is a cut-off tool, I believe, and he is using it to make a perfectly straight muzzle and breech end, just as someone today would do it on a lathe.

Spence


:
 
Spence,

Thank you or that added information.

You may well be correct that the support shown in the engraving under the file is a tool rest. I am looking for something that would hold the barrel from springing and wobbling over the long length of the barrel when turning. If that object shown is a tool rest, the object that needs to be there to keep the barrel turning/spinning true is not illustrated.

My problem is I may be relying too much on what I know has to be done to turn a barrel round and face the breech/muzzle ends off truly flat and looking at the engraving where it cannot be done with the tools and lathe set up and other tools as shown in the engraving. This could be the fault of the artist who did the engraving and illustrating a wood lathe rather than a lathe capable of the work described in the text. I also understand that when they describe something, it is in the context of the possible mechanical accuracy standards of the day.

There is also the problem with the actual description of the work in the text, I.E. “there shall be placed outside it a wooden reel, on which there is to go a cord, this reel just in the middle of the octagonal part, and well and straight.” The problem is that reel/rope is going to bend the barrel as it turns, even when they only use enough tension on the rope to barely turn the barrel. Further, that is going to introduce more wobble on the ends of the barrel and make it even more difficult to turn the ends flat. Finally, there is not a tool rest shown that will hold the “cutting iron” steady enough to cut the ends of the barrel flat, even if the ends are not perpendicular to the bore of the barrel.

However, you have really piqued my curiosity on the book/text you got the information and engraving from. Is the full text available on line or in book form or some other kind of publication? I would really love to add it to my other sources of early gunsmithing technology and study it in depth.

Gus
 
Due to "what I think is "excessive rifling depth of .015-.016" in modern MLing bbls, a tight fitting PRB combo is necessary to prevent excessive blowby along the grooves.

Just what PRB combo was used in the "olden days" isn't really known, but seeing easy loading w/ a looser fitting PRB and no short starter and allowing excessive blowby would have been a better option than getting scalped or not bringing home game.

Seeing "scalping" is no longer being practiced and bringing home game isn't normally a necessity to feed one's family, I use a loading block, a short starter, paper powder packets and an inaccurate priming "horn" to facilitate loading.

MY PRBs are tight fitting, but offer no hindrance in hunting scenarios using the above equipment and procedure.

Just wish that the bbl makers would machine shallower grooves {.010-.012 deep}......Fred
 
Gus, The Perfect Gun as Spence has it listed is available in used hardback form. Search as he posted along with 'W. Keith Neal".
Spanish and Portuguese smooth barrels were in fact turned. A Spanish barrel will have its "wedding rings" turned all the way around the circumference like most modern repro barrels are done. Many of my barrels are done without them so the rings can be filed in only on the top.
 
Thank you and Spence for that information on how to find the book in print. I really appreciate it. I would really like to compare it with the highly detailed and translated German text as found in one of the Journal of Armsmaking Technology Volumes.

BTW, I don't doubt the barrels were turned round by the Portuguese and Spanish in the period, as I have seen original examples.
Gus
 
Back
Top