• Friends, our 2nd Amendment rights are always under attack and the NRA has been a constant for decades in helping fight that fight.

    We have partnered with the NRA to offer you a discount on membership and Muzzleloading Forum gets a small percentage too of each membership, so you are supporting both the NRA and us.

    Use this link to sign up please; https://membership.nra.org/recruiters/join/XR045103

First Gun Build Questions

Muzzleloading Forum

Help Support Muzzleloading Forum:

This site may earn a commission from merchant affiliate links, including eBay, Amazon, and others.
perrybucsdad said:
Now... dogleg vs crankneck...what's the difference? The look exactly the same to me online.
Patternmaker's crankneck gouges and chisels have the bend right in front of the handle so you have a long flat (or curved for gouges) surface behind the tip like you would on a bench chisel. I like these as the long chisel can be be layed one of the flats in the barrel channel and you can apply force straight in as the handle is out of the channel.

The dogleg chisels I've seen marketed by Isle's, Pfeil and others have the ben closer to the tip which is great for getting into recesses to clean up the corners but don't offer the stability or strength of a crankneck.

Enjoy, J.D.
 
perrybucsdad said:
I took out the barrel and looked under it and there is some rough wood there. I can't get my chisel in there to shave it out, but I was able to get a 1/4" flat tip exacto knife in there and made short work of it.
I don't understand the inability to access any space in a breech inlet with a 1/8" chisel.
But a 1/4" xacto would get it. ?
I'd like to see a picture of that chisel ! :shocked2:

I'd emphasize you get your barrel down and tang inlet before ya do anything else.
If ya have to bed the breech area to create solid contact back there, you won't be the first, and it won't be the end of the world.
As others have said, you sure don't want to see the lower oblique flat from your pan, and you likely don't want to be filing 3/32" off the top flat of your barrel in order to make it flush with the wood at the breech.

slow down, one step before the next.
think.gif

I say that respectfully.
have fun !
/m
 
MeteorMan said:
I don't understand the inability to access any space in a breech inlet with a 1/8" chisel.
But a 1/4" xacto would get it. ?
I'd like to see a picture of that chisel ! :shocked2:

I can't get the chisel to lay flat against the bottom of the barrel inlet. The handle makes me put it at an angle and I can't get it to chisel fine layers. The exacto knife is much thinner and has a flexible head.

The 1/8" chisel gets into the back (breech) area just fine.
 
yep.
turn chisel over, bevel down, handle up.
use heel to prevent diving.
paring motion oblique to grain.
that's what I do at least.
a narrow scraper would be even better.
no biggie - whatever works for you is the way to go.

/mike
 
That 'chisel won't get down into the barrel channel' is confusing isn't it?

With the bevel down, the handle will be sticking up out of the channel and my store bought chisels are long enough so that when the handle is sticking up (with the bevel flat against one of the flat surfaces in there) I have no problem getting a hold on them and shaving off tiny amounts of wood to lower the barrel.

Oh well, maybe PBdad has short chisels?

Anyway, the barrel channel must be cut lower to that the edge of the barrel flat is below the bottom of the pan.
This will involve removing wood at least to where the ramrod would enter the stock.
 
So I'm going to be placing an order for a few more parts for the Mountain rifle this week, more than likely the screws and other little parts. Would the screw set from TOTW work okay? Also, I've seen the Tenn Mountain guns with two screws for the lock and one screw. What is more traditional? Should the barrel be held with pins or wedges?
 
Well, I got a lot of work done last night. I got the breech end all trued up, inleteed the tang, and started on inletting the lock internals. I'll have some pictures up soon.

Once I get this all done, what part do I move onto next? I'm running out of parts (only have the trigger left) so I need to place an order tomorrow or head down to Lodi to pick some more up. I'm thinking eiher I inlet the trigger or start to work on that tang screw or lock screw. Not sure though.
 
You still have plenty to do. Have you installed lugs on the barrel?

You need to get the barrel secured to the stock....lugs installed and pinned. Get the lock installed and secured.

Then the triggers have to be in and working right and secured.

Take your time and do it right. These are critical steps as these are the three most critical parts. If they are not right you don't have much of a gun.

Enjoy, J.D.
 
Last edited by a moderator:
No, I don't have the lugs yet. Does the Tenn Mountain rifle use lugs and tenons (or whatever they are called) or is it just pinned?

Also, how do I secure the lock? Just one bolt, but where is it installed and how do I spot it? Same with the tang bolt? I have to get all that this week.
 
So in reading the books I have, it seems I should have already drilled for the lock bolt. SInce this is a Tenn Mountain Rifle, I assume I only need one for the rear. I'm having a hard time trying to find out where this goes though. I see it should go into the bolster by the pan, but this will mean the bolt will run into the part of the breech plug that is external to the barrel. Is this correct?

Also, what is the best way to drill for all this? In the video that H House has, he doesn't show how he drills the hole in the bolster, and he just places the lock face on the stock, and starts drilling with a hand drill. He makes it look easy, so I wonder if he is drilling into the metal of the breech plug bolster (not sure if that is the proper term) or just wood.

Also, if I am going to use an 8-32 bolt, am I correct that I want to drill these holes with a 1/8" drill bit?

Any help would be appreciated.

Thanks,

John
 
NO. DO NOT DRILL THE HOLE WITH A 1/8" DRILL BIT.

You must buy specially sized tap drills for ALL threads. Rarely will a common sized drill bit work.
To locate the rear lockscrew, turn the lockplate so you are looking at the inside surface.

Notice the raised area behind the pan that runs back towards where the tumbler would be?
That is the place the rear lockscrew needs to go.

You will want the screws location to be as far to the rear of that raised location as it can be without the threads breaking out of the edge.
For an amount that will work in most situations, measure forward from the rear edge of the raised "bolster" 1/8 (.125) of an inch.
Then mark a line that is half way between the bottom and the top of the bolster in the area of that 1/8" line.
The rear lockscrew goes where they cross.

For many percussion rifles, the one screw will be historically correct. Most flintlocks also use a forward lock screw but IMO it really isn't needed for the lock to work correctly.

Before you charge off to start this project, read the following links. They should be helpful to you.

MAKING THREADS

THE LOCK SCREWS

The TAP DRILL for a #8-32 thread is a #29 drill.
This drill is .136 in diameter and using a 1/8" drill in its place will break off your tap in the hole.

The TAP DRILL for a #8-36 thread is also a #29 drill.

For a #10-24 thread use a #25 (.1495 dia) drill bit for the tap drill.
For a #10-32 thread use a #21 (.1590 dia) drill bit for the tap drill.

Also, DON'T FORGET THE THREAD CUTTING OIL!
 
Good evening. Most SMR - Southern Mountian Rifles - use pins instead of wedges to hold the barrels in the stock. You still need tennons intalled on the barrel. On a 42" barrel I use 4 pins. One about half way up the forend between your lock panels and your ramrod entry hole. The front one about 4" or 5" back from the muzzle. The remaining 2 are equally spaced between the front and back one.

Get the barrel installed and pinned first, then bolt your lock in.

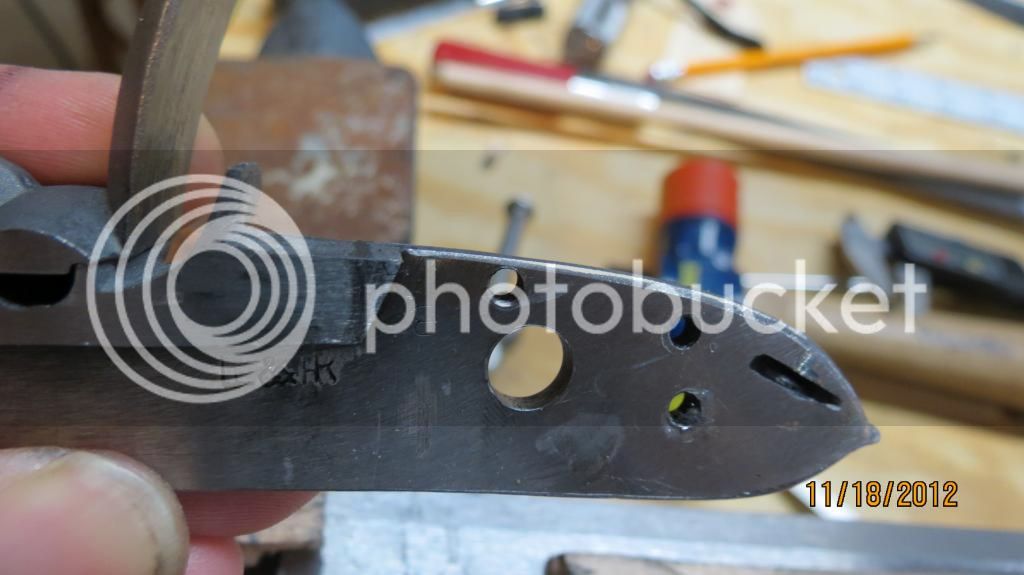
Lock bolts....or nails historically....most flintlock equipted guns use 2. It is because of the tourque forces that a flintlock has that a perucssion lock does not. That being said, most flintlocks of English design are ballanced enough to use one. On the original SMR flintlocks I have seen documented 2 is the norm.

Either way, I would use at least a 10-32 on the back one and always do. In that case the bit you will ultimately use in the lock to drill for threading will be a #21. A 8-32 uses a #29 bit for tapping.

This Craftsman set is great if you are not equipted already as it comes with the drills and taps and is inexpensive: http://www.sears.com/craftsman-13-pc-tap-set/p-00952068000P?prdNo=1&blockNo=1&blockType=G1

I often use the 10-32 back and the 8-32 forward as the 8-32 is so much thinner and doesn't interfere with ramrod. Using 2 you could easily get away with 8-32's for both...just don't get 'em mixed up.

Now, through the wood you will be drilling a "clearance hole" as the shank of the bolt is thicker that what can be drilled with the numbered tap drills. The 10-32 is .190 and the 8-32 is .163 or so. The holes through the wood will be slightly bigger than this. It's not critical what size...just a little bigger as you don't want the bolts sticking in the holes.

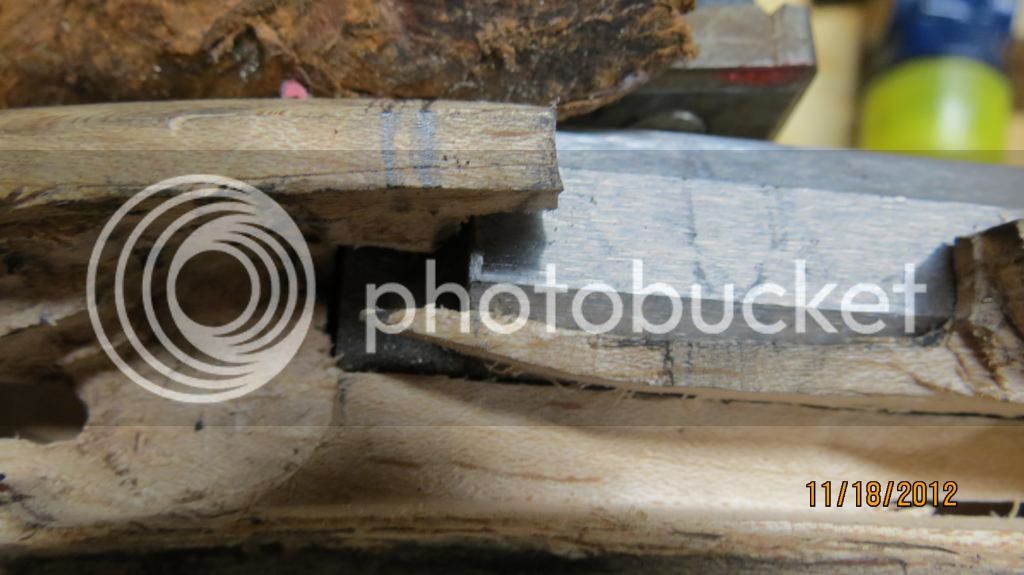
Where to drill? You are correct the back bolt should go through the bolster behind the pan fence, which is the upright piece of metal between the pan the the cock...hammer. And yes, it may very well go through the bolster for your breech plug and will also be drilled oversized for clearance.

I would determine where my lock bolt will fall on the opposite side panel that will line up with the lock bolster. With the barrel in I start drilling from there with an undersize bit. Drill until you hit the breech plug bolster. Once you hit it remove the barrel and there will be a mark there where the bit hit it....drill your clearance hole with the barrel outside the gun.

Once that's finished re-install the barrel and being careful to ensure your gun and drill are level, continue drilling through until you hit the lock bolster....stop. Remove the lock. If the mark from your bit is where you want it then you will drill the lock with the appropriate number/tap drill and tap the hole.

With the lock and barrel out, I finish drilling my oversized clearance hole in the wood.

I'm not gonna type all of this again so save or print it. If it's not clear ask questions. Wife just rung the dinner bell.

Enjoy, J.D.
 
Last edited by a moderator:
Well here is the predicament that I have. The bolster on the lock ends before it get's to the breech bolster... meaning, I would have to drill into that barrel and not the breech bolster. I have been measuring and remeasuring to make sure this is in fact true, but it seems the bolster on the lock just doesn't go back that far. So, question I have is, can I get away with drilling into the face of the lock an not the bolster. One of my guns (Pedersoli) has it done this way, and I would think it's not optimal, butI'm not sure what else could be done.

Also, am I understanding that you drill from the side plate side and not from the lock side? That seems a lot harder and could miss the target on the lock if not careful. Wouldn't it be easier to identify where you want/need the hole for the bolt to be on the lock, drill that (with the lock out of the stock with a drill press), and then reinsert it in the stock and then use a smaller drill bit, drill until it hit's the breech bolster and leaves a mark, remove the barrel, and then complete the hole through the stock. Once through the stock, enlarge the hole to the correct diameter so that the bolt does not get hung up, and then take the barrel (out of the stock) and then drill a larger hole in the breech bolster where the mark was indicated? Then once all that lines up, tap the lock plate for the bolt.

For me though the problem is the lock bolster does not seem to go back far enough. This is a combination of the barrel being setback maybe a bit more (but everything is lined up like it should be for the vent hole location and the pan) and maybe the bolster not being as long.

Thanks for the link on the tap set. I do have a few taps and drill bits, but not a nice set with the correct size's of things. I'll pick one of those up from Sears. Seems like a good deal.

Thanks,

John

EDIT: Zonie.. I just saw your post before JD's after I posted this. I'll go rear yours and see if it answers any of my questions.
 
perrybucsdad said:
Well here is the predicament that I have. The bolster on the lock ends before it get's to the breech bolster... meaning, I would have to drill into that barrel and not the breech bolster. I have been measuring and remeasuring to make sure this is in fact true, but it seems the bolster on the lock just doesn't go back that far. So, question I have is, can I get away with drilling into the face of the lock an not the bolster. One of my guns (Pedersoli) has it done this way, and I would think it's not optimal, butI'm not sure what else could be done.
You're right, it's not optimal and I'm looking at the lock right now and don't see where you can do this on the upper plate without hitting the bridle for the tumbler. Are you 100% sure that you are going to hit the barrel? With the lock out you should be able to tell. Show us a picture of the lock mortise with the barrel in and the lock out.

Also, am I understanding that you drill from the side plate side and not from the lock side? That seems a lot harder and could miss the target on the lock if not careful. Wouldn't it be easier to identify where you want/need the hole for the bolt to be on the lock, drill that (with the lock out of the stock with a drill press), and then reinsert it in the stock and then use a smaller drill bit, drill until it hit's the breech bolster and leaves a mark, remove the barrel, and then complete the hole through the stock. Once through the stock, enlarge the hole to the correct diameter so that the bolt does not get hung up, and then take the barrel (out of the stock) and then drill a larger hole in the breech bolster where the mark was indicated? Then once all that lines up, tap the lock plate for the bolt.
You could but if you are careful it won't be a problem and if you miss on the lock side the hole is covered by the lock. If your drill bit wanders and you miss on the off side how are you going to cover that. If you miss low you can us a side plate. If you miss high you are screwed. It's up to you. This is what works for me and gun building is a whole series of careful operations. You will get plenty of practice drilling straight, level tiny holes drilling your barrel pins. Drill those from both sides after you measure carefully, by the way.

For me though the problem is the lock bolster does not seem to go back far enough. This is a combination of the barrel being setback maybe a bit more (but everything is lined up like it should be for the vent hole location and the pan) and maybe the bolster not being as long.

Thanks for the link on the tap set. I do have a few taps and drill bits, but not a nice set with the correct size's of things. I'll pick one of those up from Sears. Seems like a good deal.
Show us some pictures so we can help further. The number sized bits are necessary for the tapping operation. Enjoy, J.D.
 
Okay, here are some photos. You will notice I placed two pencil lines on the stock. These represent where the bolster on the lock ends. The bolster has an angle to it so the front line (closser to the muzzle or the line on the right in the picture) is the line I can only go back to and still tap into the lock bolster. You can see where the barrel end is and where the breech is too.

I also have a picture of the back of the lock that shows the bolster area.

IMG_1029.jpg


Back of lock
IMG_1030.jpg
 
Measure the back of the bolster that is beyond the end the barrel...it looks like you have a little there. For the 8-32 you only need to buy .163 for the drill bit and hair more for the threads.

I wouldn't be afraid to notch the back of the barrel a little. I've seen it done. The threaded portion of the breech plug is likely recessed into the barrel a bit anyway and if I remember correctly, your breech plug is longer that .50" anyway.

If this is an option, I would remove the breech plug and use a small diameter round file...like a chainsaw file....to notch the back of the barrel before I drill.

You want to hit that lock bolster. J.D.
 
From the back of the barrel to the right most line on the stock (which represents the bolster before it hits that angle) is .106". That's too narrow if I don't want to hit the barrel.

What's the reason for using the chainsaw file on the barrel without the breech in as opposed to just drilling it with everything all together? Just curious as I'm sure you have some experience that I obviously don't have.
 
So, you only need a hair. Good.

About drilling it as a unit, I don't drill the barrel or the lock in the stock, but if you chose to drill it in the stock the bit is going hit the edge of the barrel the drill bit will deflect and go off at an angle.

Now, out of the gun the end of the barrel doesn't present a flat area to drill, in fact with as little as you need to remove, the center of your drill bit wouldn't even touch the barrel.

You could use a cylinder shaped grinding stone or cutter with a Dremel to remove some metal. But removing the breech plug and chucking the barrel in a vise with the breech end up and just filing a groove across where the bolt will go is safer and more precise...and the groove will be straight. You will likely have it done faster compaired to getting the Dremel set up anyway.

Enjoy, J.D.
 
Okay, JD, I'll start work on that tonight maybe, after I say a prayer to not mess up the barrel and breech plug.

Still trying to get the parts order together for some of the other items. What is better to use for the underlugs... the ones your mortice in or the ones that are like staples? I figure, I have to make the dovetail cuts on the top for the sights, so I might as well try this first on the bottom where nobody will see, but it does seem like more work than the ones you just staple in.

Do me a favor... in the two pictures above... the one showing the inlet of the lock... see that piece of wood just below the barrel that is just hanging there? That was a piece that sort of like that from the barrel inletting that was done before I received the stock. Is that something that can be removed, or do I need to be concerned with that?

EDIT: Also, where do you find the triangular files to do the dovetails with? Am I just using a jewelers file for this?
 
Back
Top