• Friends, our 2nd Amendment rights are always under attack and the NRA has been a constant for decades in helping fight that fight.

    We have partnered with the NRA to offer you a discount on membership and Muzzleloading Forum gets a small percentage too of each membership, so you are supporting both the NRA and us.

    Use this link to sign up please; https://membership.nra.org/recruiters/join/XR045103

First Gun Build Questions

Muzzleloading Forum

Help Support Muzzleloading Forum:

This site may earn a commission from merchant affiliate links, including eBay, Amazon, and others.
Definitely not needle nose pliers. There are those that use vise grips but if you are going to order new springs why not just order the spring vise? :grin:

Please use the right tool for the job. Check the one on the link I sent you. You will see the the arm not only swivels to match the angle of the spring, but slides to accommodate different spring lengths. vise grips will "pinch" the spring on one area and cause unnecessary stress at one point...you risk breaking the spring or putting a gouge in it that will lead to breakage later. The $25 + S/H spent will save you much aggravation....and $$$.

Here's another nice one for $20.99: http://www.trackofthewolf.com/Categories/PartDetail.aspx/1038/1/TOOL-VISE-DX

Chambers has the same one for $20 at www.Flintlocks.com.

Enjoy, J.D.
 
Last edited by a moderator:
jdkerstetter said:
....but isn't that statement a little non sequitur?

If the current barrel channel is cut so shallow that it will only allow 1/16" of the barrels side flats to be below the edge, leaving over 5/16" of the side flats exposed and something is not done to correct this error now, when do you propose that the correction be made? :confused:
 
Okay, I'll order one. Strange... I was looking at the L&R Site to see how to disassemble the lock, and they mentioned just using compression pliers. I'll give The Log Cabin shop a shout this AM and see if they have this in stock and order from them. If they have it and ship it today, I should have it tomorrow, otherwise it will be Wed or Thurs from TOTW.

Also, with the barrel channel, is the goal to have black evenly all over the bottom?
 
Zonie said:
If the current barrel channel is cut so shallow that it will only allow 1/16" of the barrels side flats to be below the edge, leaving over 5/16" of the side flats exposed and something is not done to correct this error now, when do you propose that the correction be made? :confused:
Well, when you put it that way...I know anything is possible with some of the precarves that are out there. With the lock pre-inlet, I believe the main concern is the vent/barrel flat to lock pan relationship though.

That's one of the problems with pre-inlet locks....you're backed into a corner and have to work around that mortise. :shake:

Enjoy, J.D.
 
:hmm: I wonder if they honor their warrenty if you damage the spring while removing it with pliers. I know some guys do but it's not good practice.

If you feel you must, then go for it. I wouldn't unless there was no other way and since you have the time, I'd order the spring vise.

If you are still compelled to do so, shim the jaws of the pliers with some brass to lessen the chance of damaging the springs.

As far as blackening the barrel....I use an acid brush to apply a thin film of black to the surface. You can use an stiff paint brush or what ever is handy. You only need a very fine film as a thick film will give false readings.

It is nye on impossible to get the entire channel blacked as the wood will never be completely smooth. It is most important to have full contact at the breech but you should have some contact throughout the channel.

Enjoy, J.D.
 
Perry
I'm working on my 1st component set as well. I read a tip offered by a member on another forum board, which may work for you. This gentleman uses tiny balls of modeling clay or Silly Putty and lays them in the bottom of the barrel channel at various points and then clamps the barrel. If they are smooshed to paper thin he has good contact, if not he knows where the barrel is still high.

As I said I'm a total rookie, but I plan to try that on my next project. The lipstick I used was a pain.

for what it's worth.
fosters
 
Thanks for the tip Fosters. I have the blackening stuff and the brush, so I will more than likely go that route, but there are many ways to skin a cat.
 
Okay, have the mainspring vise, and have disassembled the lock (took tons of pics so I hope the hell I can get this all back together... yes, and I even was extra careful with the fly).

I tell you what is a PITA is that this is already 90% carved. The margin is so tight, I don't know where I need to inlet more to get the bolster up tight against the barrel. I know I need to use inlet black, but should I be applying it to the back of the lock plate or the sides? Nothing is really transferring except in the tail, and I just opened that up.

I'm going to take a break and come back to it tomorrow night I think. I also need a really small chisel I am finding out.

Also, that James Turpin dude uses a rotary tool in his video to inlet "up to the line"... I'm a bit afraid to do that as I am concerned I may take too much wood off. Hmmmm...
 
Your fear will be justified if you do use a power tool.

In case it hasn't been said, you want a very thin coating of inletting black on the parts surfaces.

When using this stuff on the lock mortice you have to use some common sense.
Obviously some will rub off on the tight spots but did it rub off because you just happened to bump the side there or did it rub off because there is too much wood?
A close examination of the area is often required.
You only want to remove wood where it is tight, not everyplace it left a little inletting black.
 
I think I need to apply a bit to the sides of the lock plate. I beveled the edge of the plate as directed, so I don't know how well that will work, but I think there are small areas of the side that are preventing it from getting in any further, thus preventing any of the inletting black from making contact with anything in the mortice.
 
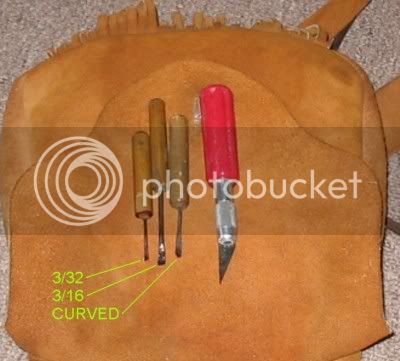
If you don't already have a good Hobby Knife like the red handled one shown in this photo you should get one.
The red handle isn't that important but it uses a #2 blade that's a little heavier duty than the typical knife.

While your at it, buy at least 10 pointed blades to fit the knife. They are very handy for doing the inlaying of all sorts of things like trigger guards, sideplates etc. etc.
Use some wet/dry sandpaper to dull up the sharp edge near the handle. All you will really be using is the pointed blade tip.
chiselstext.jpg


Install the lock into the existing mortice.
Hold the Hobby knife perpendicular to the lock plate.

Locate the pointed tip against the side of the lock and push the tip straight down into the wood.

Repeat this at least twice around the entire circumference of the lock plate.

Remove the lock plate and use the knife to remove the thin fragments of wood that the blade has cut loose and then reinstall the lock plate.

It should fit easily but not loosely into the pocket.

When it does, you are ready to start looking for contact with the supporting wood under the plate.

You may want to follow this link to see more about installing a lock.
It shows the building of the gun in my posts which was a bit different because the lock was not pre-inlayed. Aside from that, it gives some ideas about what you are trying to do now.
http://www.muzzleloadingforum.com/fusionbb/showtopic.php?tid/14990/post/14990/fromsearch/1/
 
Last edited by a moderator:
Okay, the lock plate is nice and flush and fitting well. Now, do I install all the lock parts back on at once, or do I go one at a time until they are all back on?
 
When you say its "flush" are you speaking of the face of the lockplate being flush with the outer face of the wooden lock panel or are you describing the inside bolster area of the lock being flush (touching) the barrel?

At this stage, the face of the lock should be below the face of the wood on the stocks lock panel and just touching the side of the barrel in the area of the pan.
 
The face is flush. Actually, the nose of the plate (area closer to the muzzle) seems a bit below the wood (not a problem since I believe I file the wood down at some point to shape it) but the rear is exactly flush. I tried getting the rear a little lower, but I'm not getting any transfer from the inletting black, so I believe the bolster is right up against the barrel and not allowing it to go any deeper.

So, am I at the point where I can start to add the parts back to the lock plate and inletting that? If so, which part do I start with? Main spring, bridle, something else, or does it even matter?

BTW... I couldn't find one of those Exacto knives anywhere locally. I did order one though from Amazon that should be here soon. I could find the small Exacto knife, and I had an off brand one of those, but it was causing my hands to cramp up so much. Thanks for the tip.

Z, what did you make those skinny chisels out of? It says home made on the picture, so I was just curious. I did pickup a 1/8" chisel yesterday that helped out tremendously.
 
I just noticed I didn't answer fully the question that Zonie had asked. Yes, the bolster is flush with the barrel (up against it and parallel), and the face plate is flush (or slightly below) the wood. I will sand this down tonight so that it is completely flush.

Do I move on now to inletting the lock parts, or do I need to drill and tap for the rear lock bolt that goes through the bolster. I saw James Turpin talk about this in his video and he says to do this before I do the inletting of the internal parts. The reason I am confused if I should do this now is I have yet to inlet the breech just yet.

Advice?
 
You have your lock plate in.

Bolster/pan flat up against the barrel so tight that if you put a very thin piece paper on the barrel flat and put the lock in the morise and hold it in, you can't pull the paper out? (Better if you had a .001 feeler gage to try to slide between them but you said before you don't.)

Lock doesn't rock in the mortise at all?

If it checks out then it's finally time to inlet the breech end of your barrel and set it back. Now that you know exactly where your pan is located so you can line up the vent with it.

Then the breech plug and tang!

Oh, and when you sand down the exta wood around the lock mortise leave a little for now to protect the edges of your lock panels while other work goes on...like inletting your lock internals. Plenty of time for that when you get everything inlet and you do your final shaping.

Enjoy, J.D.
 
Okay, should I reinstall the breech plug then onto the barrel for this inletting?

Also, when I was fitting the barrel to the stock, it goes in nicely, but it's a PITA to get out (sticks a bit). I don't have to force it in or anything, but when removing it I have a devil of a time. Is there something I can do to aid in removal so as not to break the forearm when removing the barrel?

Also, with the breech, I assume I need to put a bevel on the sides before I inlet?
 
perrybucsdad said:
Okay, should I reinstall the breech plug then onto the barrel for this inletting?
I set the barrel back and make sure I have good contact all the way around at the breech end...nice flat vertical surface...before I re-install the breech plug and inlet it.

Also, when I was fitting the barrel to the stock, it goes in nicely, but it's a PITA to get out (sticks a bit). I don't have to force it in or anything, but when removing it I have a devil of a time. Is there something I can do to aid in removal so as not to break the forearm when removing the barrel?
That tight of a fit is not necessary. You can open up your inlet "a hair" more. There should not be a friction fit as this will become problematic later. As was pointed out before, you will never notice a tiny gap after you brown the barrel and apply finish to the fore-end.

Also, with the breech, I assume I need to put a bevel on the sides before I inlet?
Yes, the breech plug and tang should have gentle taper or "draft" on the sides. Look in the book.

Enjoy, J.D.
 
perrybucsdad said:
Do I move on now to inletting the lock parts, or do I need to drill and tap for the rear lock bolt that goes through the bolster. I saw James Turpin talk about this in his video and he says to do this before I do the inletting of the internal parts. The reason I am confused if I should do this now is I have yet to inlet the breech just yet.

You can, or wait till the parts are inletted....these two bolts don't touch the springs etc of the lock~but you need to have the barrel/plug fully inletted and in place~ as the rear bolt passes thru the barrel plug web....

Advice?[/quote]
 
Thanks Boss, I'll get to work on it later tonight. I know I don't have a nice square fit at the breech end as there are some weird cut shapes that don't make it flat.

Also, Once I get it nice and flat, am I correct that this is when I want to take that dowel that I marked up for where the touch hole is and make sure it aligns with the toch hole to see if I need to bring the barrel back or not. I seem to recall that was a possibility since the barrel channel was precut or something related to that.
 
Back
Top